Author Archives: M MK Anouti

Batch Updates in Java Persistence Technologies

Relational data access often needs to insert or update multiple rows in a database as part of a single operation. In such scenarios, it is a good idea to use the batch update facilities built on top of JDBC, in order to submit multiple SQL commands as a single request to the underlying database. This reduces the number of roundtrips to the database, hence improving the result time of the operation.

JDBC batched updates

The Statement interface and its subinterfaces, PreparedStatement and CallableStatement support executing multiple SQL statements as a batch, by maintaining a collection of these statements that the application can add to using the method Statement.addBatch(sql). When the batch of statements is ready to be executed, the method Statement.executeBatch() can be called to execute them in one unit. To clear the current batch, the application can call the method Statement.clearBatch(). Only statements that return an update count are eligible for batch execution; select statements will throw a BatchUpdateException.

Example

The following code uses a Statement‘s batch to add a student to a course:

try(Connection connection = dataSource.getConnection()) {
    connection.setAutoCommit(false);

    try(Statement statement = connection.createStatement()) {
        statement.addBatch("insert into student values (14, 'John Doe')");
        statement.addBatch("insert into course values (3, 'Biology')");
        statement.addBatch("insert into student_courses values (14, 3)");

        int[] updateCounts = statement.executeBatch();
        connection.commit();

    } catch(BatchUpdateException ex) {
        connection.rollback();
        ... // do something with exception
    }
}

Another example using a PreparedStatement. Given a customer table, we want to import a list of customers. Notice that the method addBatch does not take an SQL string here, instead it adds the specified parameters to the prepared statement’s batch of commands.

connection.setAutoCommit(false);
try(PreparedStatement statement = connection.prepareStatement("insert into customer values (?, ?)")) {
    int n = 0;
    for(Customer customer : customers) {
        statement.setInt(1, ++n);
        statement.setString(2, customer.getName());
        statement.addBatch();
    }
    int[] updateCounts = statement.executeBatch();
    connection.commit();
} catch(BatchUpdateException ex) {
    connection.rollback();
    ... // do something with exception
}
Switching off auto-commit

One important thing to notice in the above code snippets is the call to connection.setAutoCommit(false), which allows the application to control when to commit the transaction. In the previous code, we only commit the transaction when all statements are executed successfully. In case of a BatchUpdateException thrown because of a failed statement, we roll back the transaction so that no effect happens on the database. We could have decided to examine the BatchUpdateException (as we’ll see shortly) to see which statement(s) failed and still decide to commit the statements that were processed successfully.

Disabling auto-commit mode should always be done when executing a batch of updates. Otherwise, the result of the updates depends on the behavior of the JDBC driver: it may or may not commit the successful statements.

Update counts and BatchUpdateException

The method Statement.executeBatch() returns an array of integers where each value is the number of affected rows by the corresponding statement. The order of values matches the order in which statements are added to the batch. Specifically, each element of the array is:

  1. an integer >= 0, reflecting the affected row count by the update statement,
  2. or the constant Statement.SUCCESS_NO_INFO, indicating that the statement was successful but the affected row count is unknown.

In case one of the statements failed, or was not a valid update statement, the method executeBatch() throws a BatchUpdateException. The exception can be examined by calling BatchUpdateException.getUpdateCounts(), which returns an array of integers. There are two possible scenarios:

  1. If the JDBC driver allows continuing the processing of remaining statements upon a failed one, then the result of BatchUpdateException.getUpdateCounts() is an array containing as many integers as there were statements in the batch, where the integers correspond to the affected row count for successful statements, except for the failed ones where the corresponding array element will be the constant Statement.EXECUTE_FAILED.
  2. If the JDBC driver does not continue upon a failed statement, then the result of BatchUpdateException.getUpdateCounts() is an array containing the affected row count for all successful statements until the first failed one.

Batch updates using Spring’s JdbcTemplate

Spring offers a convenient class as part of its support for JDBC. It reduces the amount of boilerplate code required when using plain JDBC such as processing result sets and closing resources. It also makes batch updates easier, as shown in the following example:

List<Customer> customers = ...;

jdbcTemplate.batchUpdate("insert into customer values (?, ?)",
             new BatchPreparedStatementSetter() {

    @Override
    public void setValues(PreparedStatement ps, int i) throws SQLException {
        ps.setLong(1, customers.get(i).getId());
        ps.setString(2, customers.get(i).getName());
    }

    @Override
    public int getBatchSize() {
        return customers.size();
    }
});

Batch updates using Hibernate

Hibernate can also make use of JDBC’s batching facility when generating the statements corresponding to its persistence operations. The main configuration property is hibernate.jdbc.batch_size which specifies the maximum batch size. This setting can be overriden for a specific session using the method Session.setJdbcBatchSize(). Hibernate will use the value specified in the method on the current session, and if not set it uses the value in the global session factory-level setting hibernate.jdbc.batch_size.

The earlier example that stores a list of customers would use the persistence methods in the Session instance:

Transaction transaction = null;
try (Session session = sessionFactory.openSession()) {
    transaction = session.getTransaction();
    transaction.begin();

    for (Customer customer : customers) {
        session.persist(customer);
    }

    transaction.commit();
} catch (RuntimeException ex) {
    if (transaction != null) {
        transaction.rollback();
    }
    throw ex;
}

When the transaction.commit() is invoked, Hibernate will send the SQL statements that insert the customer rows. If batching is enabled as described earlier (either via hibernate.jdbc.batch_size or by calling Session.setJdbcBatchSize(batchSize)), then all the generated statements will be sent as a single request. Otherwise, each statement is sent as a single request.

When employing batched updates in Hibernate for a large number of entity objects, it is a good practice to flush the session and clear its cache periodically as opposed to flushing the session at the end of the transaction. This reduces memory usage by the session cache because it holds entities that are in persistent state:

Transaction transaction = null;
try (Session session = sessionFactory.openSession()) {
    transaction = session.getTransaction();
    transaction.begin();

    int n = 0;
    for (Customer customer : customers) {
        if (++n % batchSize == 0) {
            // Flush and clear the cache every batch
            session.flush();
            session.clear();
        }
        session.persist(customer);
    }

    transaction.commit();
} catch (RuntimeException ex) {
    if (transaction != null) {
        transaction.rollback();
    }
    throw ex;
}

One important thing to know is that batch insert (not update or delete) doesn’t work with entities using identity columns (i.e. whose generation strategy is GenerationType.IDENTITY, because Hibernate needs to generate the identifier when persisting the entity and in this case the value can only be generated by sending the insert statement.

It should be noted that the above applies equally if the application uses an EntityManager instead of directly using a Session.

Batch updates using jOOQ

jOOQ also supports batch updates easily. Here’s an example that follows the earlier examples:

DSLContext create = ...;
BatchBindStep batch = create.batch(create.insertInto(CUSTOMER, ID, NAME)
                                         .values((Integer) null, null));
int n = 0;
for (Customer customer : customers) {
    batch.bind(++n, customer.getName());
}
int[] updateCounts = batch.execute();

Summary

All major Java persistence technologies support batch mode updates to relational databases leveraging the JDBC API. Such mode can improve performance for applications involving heavy workloads by reducing the number of network roundtrips to the database server.

10 Effective Tips on Using Maven

Maven is without a doubt the most popular build automation tool for software projects in the Java ecosystem. It has long replaced Ant thanks to an easier and declarative model for managing projects, providing dependency management and resolution, well-defined build phases such compile and test, and support for plugins that can do anything related to building, configuring and deploying your code. It is estimated to be used by 60% of Java developers in 2018.

Over the years, a number of usage scenarios and commands turned out to be quite useful for me when working on Maven based projects. Here are a few usage tips that help in using Maven more effectively. There are definitely many more, and one can obviously learn something new everyday for a specific use case, but these are the ones I think can be commonly applied. Note that the focus here is on aspects like command line usage, troubleshooting a certain issue, or making repetitive tasks easier. Hence you won’t find practices like using dependencyManagement to centralize dependencies, which are rather basic anyway and more used in initially composing a POM.

Friendly disclaimer: if you’re new to Maven or haven’t had enough experience using it, it’s better to set aside some time to learn about its basics, instead of trying to learn by way of tips and tricks.
1. Fetching a project’s dependency tree

This one is a no-brainer, but it is key to resolving dependency related issues such as using wrong versions. It is described in dependency:tree goal of the maven-dependency-plugin. You can simply run the below in a command line to display a tree of all dependencies used in your current project (optionally use less to scroll through the result, assuming you’re working on a big enough project):

$ mvn dependency tree | less

Note that in IDEs like Eclipse, this hierarchy of dependencies can be visualized in the POM editor. For example, in Eclipse it can be viewed on the “Dependency Hierarchy” tab of the POM editor.

2. Analyze dependencies

It is a good practice to declare in the POM only those dependencies that a project actually uses, and often you want to explicitly declare dependencies your project uses even if they are transitively included. This makes the POM cleaner, just like it’s a good practice to remove unused imports and declare those for types you use in Java code.

To do that, either run the dependency:analyze goal as a standalone command:

$ mvn dependency:analyze

Whenever the plugin finds an unused dependency that is declared in the POM, or a used dependency that is undeclared, a warning is shown in the output. If a build failure needs to be raised because of this, the paramater failOnWarning can be set to true:

$ mvn dependency:analyze -DfailOnWarning=true

Another way is to use the dependency:analyze-only goal, which does the same thing, but should be used within the build lifecycle, i.e. it can be integrated into the project’s POM:

<plugin>
    <groupId>org.apache.maven.plugins</groupId>
    <artifactId>maven-dependency-plugin</artifactId>
    <executions>
        <execution>
            <id>analyze-deps</id>
            <goals>
                <goal>analyze-only</goal>
            </goals>
        </execution>
    </executions>
</plugin>
3. Skipping tests during a local build

When building a project on a development machine, you may want to skip existing unit and integration tests, perhaps because you want to build the code more quickly or because you don’t care about tests for the moment. Maybe you want to run tests only after you feel you have a first draft of your commit ready to be tested. Note that this should never be done on a CI/CD machine that builds and deploys to a production or a staging environment.

There are two options to consider:

  1. skipping the running of tests
    You can do it with mvn package -DskipTests=true. You can shorten the property to just -DskipTests.
  2. skipping the compilation and running of tests (not recommended)
    You can do it with mvn package -Dmaven.test.skip=true. You can shorten the property to just -Dmaven.test.skip.

The latter skips the entire testing related tasks (both compiling and running tests) so it may make the build slightly faster, but -DskipTests is recommended instead because it allows you to detect changes that broke the tests at compile-time. This is often important, as discovering and fixing errors earlier may end up requiring a re-iteration on the changes in the main code, maybe to do some refactoring to make the code more easier to test.

Bonus tip: Consider running tests in parallel, as described in the Surefire plugin documentation. This is a much better long term solution, but the cost is that you should make sure parallel tests are independent and don’t cause concurrency issues because they will share the same JVM process.

4. Debugging unit tests

The aforementioned properties are understood by the maven-surefire-plugin, which is responsible for running unit tests. This plugin is invoked during the test phase of the build lifecycle. Sometimes you don’t want to debug a failing test in your IDE, maybe because you’re like me and don’t always trust that the IDE is running the test with new changes. Sometimes you have a command line window and just want to stick to it. In that case, pass a property to the plugin as follows:

$ mvn clean package -Dmaven.surefire.debug

This will cause the plugin to listen to a remote debugger on port 5005. Now you can configure a remote debugging in your IDE to connect to the listening plugin and execute the tests in debug mode.

Bonus tip: If you ever need to do the same with integration tests, just use the property -Dmaven.failsafe.debug instead. The name comes from the maven-failsafe-plugin which is responsible for running integration tests.

5. Running a specific test

So you debugged a failing test and fixed the failure and now you want to re-run it to make sure it is successful. To tell Surefire to only run that specific test, the test parameter can be passed on the command line:

$ mvn clean package -Dtest=MyTest

According to the documentation of the test goal of the Maven Surefire plugin, the test parameter can be used to further control the specific test methods to execute:

$ mvn clean package -Dtest=MyTest#testMethod
6. Resuming the build from a project

I was hesitating whether or not to include this one because it looked trivial and Maven usually points it to the user upon a build failure, but I decided it’s still worth listing. Whenever an error occurs in a build and you fixed it and want to re-run the build, the option -rf, followed with a colon and the name of the failed module, can be used to resume the build from the failed module, in order to avoid re-building already successfully built modules:

$ mvn clean install -rf :db-impl
7. Effective POM

Instead of navigating multiple POM files at different levels in your multi-module project and/or POM files defined in dependencies themselves in order to figure out what transitive dependencies are resolved or what plugin configuration is applied, a simple command can show the effective POM that consists of the entire configuration snapshot of the current POM, including inherited information from parent POMs such as properties, plugins, dependency information, and profiles.

$ mvn help:effective-pom | less

In Eclipse it can be viewed by clicking on the bottom tab labeled “Effective POM” within the default POM editor.

8. Building specific modules and their dependencies

In the case of multi-module projects with many dependent modules, you may want to specify explicitly which modules to build and ignore the others. For example you just want to build one or two modules you’re working on along with their dependencies, instead of building the whole list of modules. Instead of just doing mvn clean install from the aggregator POM, you can use the -pl command line option. For example, to build only module db-impl, you can execute the command:

$ mvn clean install -pl db-impl -am

The option -am, shorthand for --also-make, tells Maven to build also the projects required by the list in -pl.

9. Configuring JVM memory

Before building a project, Maven will analyze its hierarchy of modules to construct a graph of dependencies that specifies the order of building these individual modules. Sometimes this analysis step can require more memory than the default allocated to the JVM process of Maven, hence causing a Java heap space error. To configure these memory settings, the MAVEN_OPTS environment variable can be set:

$ export MAVEN_OPTS=-Xms256m -Xmx1024m
10. Debugging a Maven plugin

Since Maven has a rich plugin ecosystem and it is easy to develop a custom plugin, it is likely to be in a situation where a developer needs to debug a problem with such plugins. Given the source code of your plugin is imported into your IDE, you can run Maven in debug mode using the mvnDebug executable (e.g. mvnDebug clean install), and Maven will wait for a remote debugger in the IDE to attach on port 8000.

Conclusion

Knowing how a build tool like Maven works is essential in order to make the most of it, but there are some use cases that often repeat themselves where it’s worth remembering some quick solutions. If you have any other tips that are similar to the above, feel free to comment.

New Java HTTP Client

One of the features to be included with the upcoming JDK 11 release is a standardized HTTP client API that aims to replace the legacy HttpUrlConnection class, which has been present in the JDK since the very early years of Java. The problem with this old API is described in the enhancement proposal, mainly that it is now considered old and difficult to use.

The new API supports both HTTP/1.1 and HTTP/2. The newer version of the HTTP protocol is designed to improve the overall performance of sending requests by a client and receiving responses from the server. This is achieved by introducing a number of changes such as stream multiplexing, header compression and push promises. In addition, the new HTTP client also natively supports WebSockets.

A new module named java.net.http that exports a package of the same name is defined in JDK 11, which contains the client interfaces:

module java.net.http {
    exports java.net.http;
}

You can view the API Javadocs here (note that since JDK 11 is not yet released, this API is not 100% final).

The package contains the following types:

  • HttpClient: the main entry point of the API. This is the HTTP client that is used to send requests and receive responses. It supports sending requests both synchronously and asynchronously, by invoking its methods send and sendAsync, respectively. To create an instance, a Builder is provided. Once created, the instance is immutable.
  • HttpRequest: encapsulates an HTTP request, including the target URI, the method (GET, POST, etc), headers and other information. A request is constructed using a builder, is immutable once created, and can be sent multiple times.
  • HttpRequest.BodyPublisher: If a request has a body (e.g. in POST requests), this is the entity responsible for publishing the body content from a given source, e.g. from a string, a file, etc.
  • HttpResponse: encapsulates an HTTP response, including headers and a message body if any. This is what the client receives after sending an HttpRequest.
  • HttpResponse.BodyHandler: a functional interface that accepts some information about the response (status code and headers), and returns a BodySubscriber, which itself handles consuming the response body.
  • HttpResponse.BodySubscriber: subscribes for the response body, and consumes its bytes into some other form (a string, a file, or some other storage type).

BodyPublisher is a subinterface of Flow.Publisher, introduced in Java 9. Similarly, BodySubscriber is a subinterface of Flow.Subscriber. This means that these interfaces are aligned with the reactive streams approach, which is suitable for asynchronously sending requests using HTTP/2.

Implementations for common types of body publishers, handlers and subscribers are pre-defined in factory classes BodyPublishers, BodyHandlers and BodySubscribers. For example, to create a BodyHandler that processes the response body bytes (via an underlying BodySubscriber)  as a string, the method BodyHandlers.ofString() can be used to create such an implementation.  If the response body needs to be saved in a file, the method BodyHandlers.ofFile() can be used.

Code examples

Specifying the HTTP protocol version

To create an HTTP client that prefers HTTP/2 (which is the default, so the version() can be omitted):

HttpClient httpClient = HttpClient.newBuilder()
			   .version(Version.HTTP_2)  // this is the default
			   .build();

When HTTP/2 is specified, the first request to an origin server will try to use it. If the server supports the new protocol version, then the response will be sent using that version. All subsequent requests/responses to that server will use HTTP/2. If the server does not supports HTTP/2, then HTTP/1.1 will be used.

Specifying a proxy

To set a proxy for the request, the builder method proxy is used to provide a ProxySelector. If the proxy host and port are fixed, the proxy selector can be hardcoded in the selector:

HttpClient httpClient = HttpClient.newBuilder()
			   .proxy(ProxySelector.of(new InetSocketAddress(proxyHost, proxyPort)))
			   .build();
Creating a GET request

The request methods have associated builder methods based on their actual names. In the below example, GET() is optional:

HttpRequest request = HttpRequest.newBuilder()
               .uri(URI.create("https://http2.github.io/"))
               .GET()   // this is the default
               .build();
Creating a POST request with a body

To create a request that has a body in it, a BodyPublisher is required in order to convert the source of the body into bytes. One of the pre-defined publishers can be created from the static factory methods in BodyPublishers:

HttpRequest mainRequest = HttpRequest.newBuilder()
               .uri(URI.create("https://http2.github.io/"))
               .POST(BodyPublishers.ofString(json))
               .build();
Sending an HTTP request

There are two ways of sending a request: either synchronously (blocking until the response is received), or asynchronously. To send in blocking mode, we invoke the send() method on the HTTP client, providing the request instance and a BodyHandler. Here is an example that receives a response representing the body as a string:

HttpRequest request = HttpRequest.newBuilder()
               .uri(URI.create("https://http2.github.io/"))
               .build();

HttpResponse<String> response = httpClient.send(request, BodyHandlers.ofString());
logger.info("Response status code: " + response.statusCode());
logger.info("Response headers: " + response.headers());
logger.info("Response body: " + response.body());
Asynchronously sending an HTTP request

Sometimes it is useful to avoid blocking until the response is returned by the server. In this case we can call the method sendAsync(), which returns a CompletableFuture. A CompletableFuture provides a mechanism to chain subsequent actions to be triggered when it is completed. In this context, the returned CompletableFuture is completed when an HttpResponse is received. If you are not familiar with CompletableFuture, this post provides an overview and several examples to illustrate how to use it.

httpClient.sendAsync(request, BodyHandlers.ofString())
          .thenAccept(response -> {

       logger.info("Response status code: " + response.statusCode());
       logger.info("Response headers: " + response.headers());
       logger.info("Response body: " + response.body());
});

In the above example, sendAsync would return a CompletableFuture<HttpResponse>. The thenAccept method adds a Consumer to be triggered when the response is available.

Sending multiple requests using HTTP/1.1

When loading a Web page in a browser using HTTP/1.1, several requests are sent behind the scenes. A request is first sent to retrieve the main HTML of the page, and then several requests are typically needed to retrieve the resources referenced by the HTML, e.g. CSS files, images and so on. To do this, several TCP connections are created to support the parallel requests, due to a limitation in the protocol where only one request/response can occur on a given connection. However, the number of connections is usually limited (most tests on page loads seem to create 6 connections). This means that many requests will wait until previous requests are complete before they can be sent. The following example reproduces this scenario by loading a page that links to hundreds of images (taken from an online demo on HTTP/2).

A request is first sent to retrieve the HTML main resource. Then we parse the result, and for each image in the document a request is submitted in parallel using an executor with a limited number of threads:

ExecutorService executor = Executors.newFixedThreadPool(6);

HttpClient httpClient = HttpClient.newBuilder()
		.version(Version.HTTP_1_1)
		.build();

HttpRequest mainRequest = HttpRequest.newBuilder()
        .uri(URI.create("https://http2.akamai.com/demo/h2_demo_frame.html"))
        .build();

HttpResponse mainResponse = httpClient.send(mainRequest, BodyHandlers.ofString());

List<Future<?>> futures = new ArrayList<>();

// For each image resource in the main HTML, send a request on a separate thread
responseBody.lines()
            .filter(line -> line.trim().startsWith("<img height"))
            .map(line -> line.substring(line.indexOf("src='") + 5, line.indexOf("'/>")))
            .forEach(image -> {

             Future imgFuture = executor.submit(() -> {
                 HttpRequest imgRequest = HttpRequest.newBuilder()
                         .uri(URI.create("https://http2.akamai.com" + image))
                         .build();
                 try {
                     HttpResponse imageResponse = httpClient.send(imgRequest, BodyHandlers.ofString());
                     logger.info("Loaded " + image + ", status code: " + imageResponse.statusCode());
                 } catch (IOException | InterruptedException ex) {
                     logger.error("Error during image request for " + image, ex);
                 }
             });
             futures.add(imgFuture);
         });

// Wait for all submitted image loads to be completed
futures.forEach(f -> {
    try {
        f.get();
    } catch (InterruptedException | ExecutionException ex) {
        logger.error("Error waiting for image load", ex);
    }
});

Below is a snapshot of TCP connections created by the previous HTTP/1.1 example:


TCPView_HTTP1_1

Sending multiple requests using HTTP/2

Running the scenario above but using HTTP/2 (by setting version(Version.HTTP_2) on the created client instance, we can see that a similar latency is achieved but with only one TCP connection being used as shown in the below screenshot, hence using fewer resources. This is achieved through multiplexing, a key feature that enables multiple requests to be sent concurrently over the same connection, in the form of multiple streams of frames. Each request / response is decomposed into frames which are sent over a stream. The client is then responsible for assembling the frames into the final response.

TCPView_HTTP2

If we increase the level of parallelism by allowing more threads in the custom executor, the latency is remarkably reduced, obviously since more requests are sent in parallel over the same TCP connection.

Handling push promises in HTTP/2

Some Web servers support push promises, whereby instead of the browser having to request every page asset, the server can guess which resources are likely to be needed by the client and push them to the client. For each resource, the server sends a special request known as a push promise in the form of a frame to the client. The HttpClient has an overloaded sendAsync method that allows us to handle such promises by either accepting them or rejecting them, as shown in the below example:

httpClient.sendAsync(mainRequest, BodyHandlers.ofString(), new PushPromiseHandler() {

    @Override
    public void applyPushPromise(HttpRequest initiatingRequest, HttpRequest pushPromiseRequest, Function<BodyHandler<String>, CompletableFuture<HttpResponse<String>>> acceptor) {
        // invoke the acceptor function to accept the promise
        acceptor.apply(BodyHandlers.ofString())
                .thenAccept(resp -> logger.info("Got pushed response " + resp.uri()));
    }
})

Pushed resources can lead to better performance by avoiding a round-trip for requests explicitly made by the client that are otherwise pushed by the server along with the initial request.

WebSocket example

The HTTP client also supports the WebSocket protocol which is used in real-time Web applications to provide client-server communication with low message overhead. Below is an example of how to use an HttpClient to create a WebSocket that connects to a URI, sends messages for one second and then closes its output. The API also makes use of asynchronous calls that return CompletableFuture:

HttpClient httpClient = HttpClient.newBuilder().executor(executor).build();
Builder webSocketBuilder = httpClient.newWebSocketBuilder();
WebSocket webSocket = webSocketBuilder.buildAsync(URI.create("wss://echo.websocket.org"), new WebSocket.Listener() {
    @Override
    public void onOpen(WebSocket webSocket) {
        logger.info("CONNECTED");
        webSocket.sendText("This is a message", true);
        Listener.super.onOpen(webSocket);
    }

    @Override
    public CompletionStage<?> onText(WebSocket webSocket, CharSequence data, boolean last) {
        logger.info("onText received with data " + data);
        if(!webSocket.isOutputClosed()) {
            webSocket.sendText("This is a message", true);
        }
        return Listener.super.onText(webSocket, data, last);
    }

    @Override
    public CompletionStage<?> onClose(WebSocket webSocket, int statusCode, String reason) {
        logger.info("Closed with status " + statusCode + ", reason: " + reason);
        executor.shutdown();
        return Listener.super.onClose(webSocket, statusCode, reason);
    }
}).join();
logger.info("WebSocket created");

Thread.sleep(1000);
webSocket.sendClose(WebSocket.NORMAL_CLOSURE, "ok").thenRun(() -> logger.info("Sent close"));
Conclusion

The new HTTP client API provides a standard way to perform HTTP network operations with support for modern Web features such as HTTP/2, without the need to add third-party dependencies. Full code of the above examples can be viewed on here. If you enjoyed this post, feel free to share it!

OpenJDK references:
http://openjdk.java.net/groups/net/httpclient/intro.html
http://openjdk.java.net/groups/net/httpclient/recipes.html

Introduction to Java Bytecode

Reading compiled Java bytecode can be tedious even for experienced Java developers. Why do we need to know about such low level stuff in the first place? Here is a simple scenario that happened to me last week: I had made some code changes on my machine long time ago, compiled a Jar and deployed it on a server to test a potential fix for a performance issue. Unfortunately, the code was never checked in to a version control system and for whatever reason, the local changes were deleted without a trace. After a couple of months, I needed those changes in source form again (which took quite an effort to come up with) but could not find them!

Luckily the compiled code still existed on that remote server. So with a sigh of relief I fetched the Jar again and opened it using a decompiler editor. Only one problem, the decompiler GUI is not a flawless tool, and out of the many classes in that Jar, for some reason, only the specific class I was looking to decompile caused a bug in the UI to be exercised whenever I opened it and the decompiler to crash!

Desperate times call for desperate measures… fortunately I was familiar with raw bytecode and I’d rather take some time manually decompiling some pieces of the code rather than work through the changes and testing them again. Since I still remembered at least where to look in the code, reading bytecode helped me pinpoint the exact changes and construct them back in source form. (I made sure to learn from my mistake and preserve them this time!)

The nice thing about bytecode is that you learn its syntax once and it applies on all Java supported platforms, because it is an intermediate representation of the code, and not the actual executable code for the underlying CPU. Moreover, bytecode is simpler than native machine code because the JVM architecture is rather simple, hence simplifying the instruction set. Yet another nice thing is that all instructions in this instruction set are fully documented by Oracle.

Before learning about the bytecode instruction set though, let’s get familiar with a few things about the JVM which are needed as a prerequisite.

JVM data types

Java is statically typed, which affects the design of the bytecode instructions such that an instruction expects itself to operate on values of specific types. For example, there are several add instructions to add two numbers: iadd, ladd, fadd, dadd. They expect operands of type, respectively, int, long, float and double. The majority of bytecode has this characteristic of having different forms of the same functionality but different depending on the operand types.

The data types defined by the JVM are:

  1. Primitive types:
    • Numeric types: byte (8-bit 2’s complement), short (16-bit 2’s complement), int (32-bit 2’s complement), long (64-bit 2’s complement), char (16-bit unsigned Unicode), float (32-bit IEEE 754 single precision FP), double (64-bit IEEE 754 double precision FP)
    • boolean type
    • returnAddress: pointer to instruction
  2. Reference types:
    • Class types
    • Array types
    • Interface types

The boolean type has limited support in bytecode. For example, there are no instructions that directly operate on boolean values. Boolean values are instead converted to int by the compiler and the corresponding int instruction is used.

Java developers should be familiar with all of the above types, except returnAddress which has no equivalent programming language type.

Stack-based architecture

The simplicity of the bytecode instruction set is largely due to Sun having designed a stack-based VM architecture, as opposed to a register-based one. There are various memory components used by a JVM process, but only the JVM stacks need to be examined in detail on to essentially be able to follow bytecode instructions:

PC register: for each thread running in a Java program, a PC register stores the address of the current instruction.

JVM stack: for each thread, a stack is allocated where local variables, method arguments and return values are stored. Here is an illustration showing stacks for 3 threads.

jvm_stacks

Heap: memory shared by all threads, and storing objects (class instances and arrays). Object deallocation is managed by a garbage collector.

heap.png

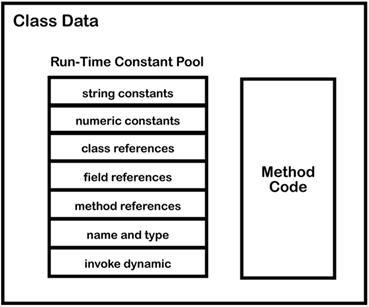
Method area: for each loaded class, stores the code of methods and a table of symbols (e.g. references to fields or methods) and constants known as the constant pool.

method_area.png

A JVM stack is composed of frames, each pushed onto the stack when a method is invoked and popped from the stack when the method completes (either by returning normally or by throwing an exception). Each frame further consists of:

  1. An array of local variables, indexed from 0 to its length minus 1. The length is computed by the compiler. A local variable can hold a value of any type, except long and double values which occupy two local variables.
  2. An operand stack used to store intermediate values that would act as operands for instructions, or to push arguments to method invocations.

stack_frame_zoom.png

Bytecode explored

With an idea about the internals of a JVM, we can look at some basic bytecode example generated from sample code. Each method in a Java class file has a code segment that consists of a sequence of instructions, each having the following format:

opcode (1 byte)      operand1 (optional)      operand2 (optional)      ...

That is an instruction consists of one-byte opcode and zero or more operands that contain the data to operate.

Within the stack frame of the currently executing method, an instruction can push or pop values onto the operand stack, and it can potentially load or store values in the array local variables. Let’s look at a simple example:

public static void main(String[] args) {
    int a = 1;
    int b = 2;
    int c = a + b;
}

In order to print the resulting bytecode in the compiled class (assuming it is in a file Test.class), we can run the javap tool:

javap -v Test.class

and we get:

public static void main(java.lang.String[]);
descriptor: ([Ljava/lang/String;)V
flags: (0x0009) ACC_PUBLIC, ACC_STATIC
Code:
stack=2, locals=4, args_size=1
0: iconst_1
1: istore_1
2: iconst_2
3: istore_2
4: iload_1
5: iload_2
6: iadd
7: istore_3
8: return
...

We can see the method signature for the main method, a descriptor which indicates that the method takes an array of Strings ([Ljava/lang/String; ) and has a void return type (V ). A set of flags follow which describe the method as public (ACC_PUBLIC) and static (ACC_STATIC).

The most important part is the Code attribute, which contains the instructions for the method along with information such as the maximum depth of the operand stack (2 in this case), and the number of local variables allocated in the frame for this method (4 in this case). All local variables are referenced in the above instructions except the first one (at index 0) which holds the reference to the args argument. The other 3 local variables correspond to variables a, b and c in the source code.

The instructions from address 0 to 8 will do the following:

iconst_1: Push the integer constant 1 onto the operand stack.

iconst_1.png

istore_1: Pop the top operand (an int value) and store it in local variable at index 1, which corresponds to variable a.

istore_1.png

iconst_2: Push the integer constant 2 onto the operand stack.

iconst_2.png

istore_2: Pop the top operand int value and store it in local variable at index 2, which corresponds to variable b.

istore_2.png

iload_1: Load the int value from local variable at index 1 and push it onto the operand stack.

iload_1.png

iload_2: Load int value from local variable at index 1 and push it onto the operand stack.

iload_2.png

iadd: Pop the top two int values from the operand stack, add them and push the result back onto the operand stack.

iadd

istore_3: Pop the top operand int value and store it in local variable at index 3, which corresponds to variable c.

istore_3.png

return: Return from the void method.

Each of the above instructions consists of only an opcode, which dictates exactly the operation to be executed by the JVM.

Method invocations

In the above example, there is only one method, the main method. Let’s assume that we need to a more elaborate computation for the value of variable c, and we decide to place that in a new method called calc:

public static void main(String[] args) {
    int a = 1;
    int b = 2;
    int c = calc(a, b);
}

static int calc(int a, int b) {
    return (int) Math.sqrt(Math.pow(a, 2) + Math.pow(b, 2));
}

Let’s see the resulting bytecode:

public static void main(java.lang.String[]);
  descriptor: ([Ljava/lang/String;)V
  flags: (0x0009) ACC_PUBLIC, ACC_STATIC
  Code:
    stack=2, locals=4, args_size=1
       0: iconst_1
       1: istore_1
       2: iconst_2
       3: istore_2
       4: iload_1
       5: iload_2
       6: invokestatic  #2         // Method calc:(II)I
       9: istore_3
      10: return

static int calc(int, int);
  descriptor: (II)I
  flags: (0x0008) ACC_STATIC
  Code:
    stack=6, locals=2, args_size=2
       0: iload_0
       1: i2d
       2: ldc2_w        #3         // double 2.0d
       5: invokestatic  #5         // Method java/lang/Math.pow:(DD)D
       8: iload_1
       9: i2d
      10: ldc2_w        #3         // double 2.0d
      13: invokestatic  #5         // Method java/lang/Math.pow:(DD)D
      16: dadd
      17: invokestatic  #6         // Method java/lang/Math.sqrt:(D)D
      20: d2i
      21: ireturn

The only difference in the main method code is that instead of having the iadd instruction, we now an invokestatic instruction, which simply invokes the static method calc. The key thing to note is that the operand stack contained the two arguments that are passed to the method calc. In other words, the calling method prepares all arguments of the to-be-called method by pushing them onto the operand stack in the correct order. invokestatic (or a similar invoke* instruction as will be seen later) will subsequently pop these arguments, and a new frame is created for the invoked method where the arguments are placed in its local variable array.

We also notice that the invokestatic instruction occupies 3 bytes by looking at the address which jumped from 6 to 9. This is because unlike all instructions seen so far, invokestatic includes two additional bytes to construct the reference to the method to be invoked (in addition to the opcode). The reference is shown by javap as #2 which is a symbolic reference to the calc method which is resolved from the constant pool described earlier.

The other new information is obviously the code for the calc method itself. It first loads the first integer argument onto the operand stack (iload_0). The next instruction i2d converts it to a double by applying widening conversion. The resulting double replaces the top of the operand stack.

The next instruction pushes a double constant 2.0d  (taken from the constant pool) onto the operand stack. Then the static Math.pow method is invoked with the two operand values prepared so far (the first argument to calc, and the constant 2.0d). When the Math.pow method returns, its result will be stored on the operand stack of its invoker. This can be illustrated below.

math_pow.png

The same procedure is applied to compute Math.pow(b, 2):

math_pow2.png

The next instruction dadd pops the top two intermediate results, adds them and pushes the sum back to the top. Finally, invokestatic invokes Math.sqrt on the resulting sum, and the result is cast from double to int using narrowing conversion (d2i). The resulting int is returned to main method, which stores it back to c (istore_3).

Instance creations

Let’s modify the example and introduce a class Point to encapsulate XY coordinates.

public class Test {
    public static void main(String[] args) {
        Point a = new Point(1, 1);
        Point b = new Point(5, 3);
        int c = a.area(b);
    }
}

class Point {
    int x, y;

    Point(int x, int y) {
        this.x = x;
        this.y = y;
    }

    public int area(Point b) {
        int length = Math.abs(b.y - this.y);
        int width = Math.abs(b.x - this.x);
        return length * width;
    }
}

The compiled bytecode for the main method is shown below:

 public static void main(java.lang.String[]);
   descriptor: ([Ljava/lang/String;)V
   flags: (0x0009) ACC_PUBLIC, ACC_STATIC
   Code:
     stack=4, locals=4, args_size=1
        0: new           #2       // class test/Point
        3: dup
        4: iconst_1
        5: iconst_1
        6: invokespecial #3       // Method test/Point."<init>":(II)V
        9: astore_1
       10: new           #2       // class test/Point
       13: dup
       14: iconst_5
       15: iconst_3
       16: invokespecial #3       // Method test/Point."<init>":(II)V
       19: astore_2
       20: aload_1
       21: aload_2
       22: invokevirtual #4       // Method test/Point.area:(Ltest/Point;)I
       25: istore_3
       26: return

The new instructions encountereted here are new , dup and invokespecial. Similar to the new operator in the programming language, the new instruction creates an object of the type specified in the operand passed to it (which is a symbolic reference to class Point). Memory for the object is allocated on the heap, and a reference to the object is pushed on the operand stack.

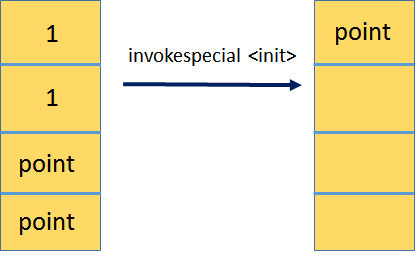
The dup instruction duplicates the top operand stack value, which means that now we have two references the Point object on the top of the stack. The next three instructions push onto the operand stack the arguments of the constructor (used to initialize the object), and then invoke a special initialization method called   which corresponds the contructor. The  method is where the fields x and y will get initialized. After the method is finished, the top three operand stack values are consumed, and what remains is the original reference to the created object (which is by now successfully initialized).

init.png

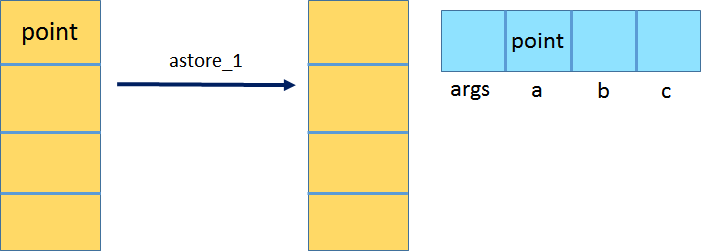
Next astore_1 pops that Point reference and assigns to local variable at index 1 (the a in astore_1 indicates this is a reference value).

init_store.png

The same procedure is repeated for creating and initializing the second Point instance, which is assigned to variable b .

init2.png

init_store2.png

The last step loads the references to the two Point objects from local variables at indexes 1 and 2 (using aload_1 and aload_2 respectively), and invokes the area method using invokevirtual, which handles dispatching the call to the appropriate method based on the actual type of the object. For example, if the variable a contained an instance of type SpecialPoint that extends Point, and the subtype overrides the area method, then the overriden method is invoked. In this case, there is no subclass, and hence only one area method is available.

area.png

Note that even though the area method accepts one argument, there are two Point references on the top of the stack. The first one (pointA  which comes from variable a) is actually the instance on which the method is invoked (otherwise referred to as this in the programming language), and it will be passed in the first local variable of the new frame for the area method. The other operand value (pointB) is the argument to the area method.

The other way around

You don’t need to master the understanding of each instruction and the exact flow of execution to gain an idea about what the program does based on the bytecode at hand. For example, in my case I wanted to check if the code employed a Java stream to read a file, and whether the stream was properly closed. Now given the below bytecode, it is relatively easy to determine that indeed a stream is used and most likely it is being closed as part of a try-with-resources statement.

 public static void main(java.lang.String[]) throws java.lang.Exception;
  descriptor: ([Ljava/lang/String;)V
  flags: (0x0009) ACC_PUBLIC, ACC_STATIC
  Code:
    stack=2, locals=8, args_size=1
       0: ldc           #2                  // class test/Test
       2: ldc           #3                  // String input.txt
       4: invokevirtual #4                  // Method java/lang/Class.getResource:(Ljava/lang/String;)Ljava/net/URL;
       7: invokevirtual #5                  // Method java/net/URL.toURI:()Ljava/net/URI;
      10: invokestatic  #6                  // Method java/nio/file/Paths.get:(Ljava/net/URI;)Ljava/nio/file/Path;
      13: astore_1
      14: new           #7                  // class java/lang/StringBuilder
      17: dup
      18: invokespecial #8                  // Method java/lang/StringBuilder."<init>":()V
      21: astore_2
      22: aload_1
      23: invokestatic  #9                  // Method java/nio/file/Files.lines:(Ljava/nio/file/Path;)Ljava/util/stream/Stream;
      26: astore_3
      27: aconst_null
      28: astore        4
      30: aload_3
      31: aload_2
      32: invokedynamic #10,  0             // InvokeDynamic #0:accept:(Ljava/lang/StringBuilder;)Ljava/util/function/Consumer;
      37: invokeinterface #11,  2           // InterfaceMethod java/util/stream/Stream.forEach:(Ljava/util/function/Consumer;)V
      42: aload_3
      43: ifnull        131
      46: aload         4
      48: ifnull        72
      51: aload_3
      52: invokeinterface #12,  1           // InterfaceMethod java/util/stream/Stream.close:()V
      57: goto          131
      60: astore        5
      62: aload         4
      64: aload         5
      66: invokevirtual #14                 // Method java/lang/Throwable.addSuppressed:(Ljava/lang/Throwable;)V
      69: goto          131
      72: aload_3
      73: invokeinterface #12,  1           // InterfaceMethod java/util/stream/Stream.close:()V
      78: goto          131
      81: astore        5
      83: aload         5
      85: astore        4
      87: aload         5
      89: athrow
      90: astore        6
      92: aload_3
      93: ifnull        128
      96: aload         4
      98: ifnull        122
     101: aload_3
     102: invokeinterface #12,  1           // InterfaceMethod java/util/stream/Stream.close:()V
     107: goto          128
     110: astore        7
     112: aload         4
     114: aload         7
     116: invokevirtual #14                 // Method java/lang/Throwable.addSuppressed:(Ljava/lang/Throwable;)V
     119: goto          128
     122: aload_3
     123: invokeinterface #12,  1           // InterfaceMethod java/util/stream/Stream.close:()V
     128: aload         6
     130: athrow
     131: getstatic     #15                 // Field java/lang/System.out:Ljava/io/PrintStream;
     134: aload_2
     135: invokevirtual #16                 // Method java/lang/StringBuilder.toString:()Ljava/lang/String;
     138: invokevirtual #17                 // Method java/io/PrintStream.println:(Ljava/lang/String;)V
     141: return
    ...

We see occurrences of java/util/stream/Stream where forEach is called, preceded by a call to InvokeDynamic with a reference to a Consumer. And then we see a chunk of bytecode that calls Stream.close along with branches that call Throwable.addSuppressed. This is the basic code that gets generated by the compiler for a try-with-resources statement.

Here’s the original source for completeness:

public static void main(String[] args) throws Exception {
    Path path = Paths.get(Test.class.getResource("input.txt").toURI());
    StringBuilder data = new StringBuilder();
    try(Stream lines = Files.lines(path)) {
        lines.forEach(line -> data.append(line).append("\n"));
    }

    System.out.println(data.toString());
}

Conclusion

Thanks to the simplicity of the bytecode instruction set and the near absence of compiler optimizations when generating its instructions, disassembling class files could be one way to examine changes into your application code without having the source, if that ever becomes a need.


Compact Strings in Java 9

One of the performance enhancements introduced in the JVM (Oracle HotSpot to be specific) as part of Java SE 9 is compact strings. It aims to reduce the size of String objects, hence reducing the overall footprint of Java applications. As a result, it can also reduce the time spent on garbage collection.

The feature is based on the observation that most String objects do not need 2 bytes to encode every character, because most applications use only Latin-1 characters. Hence, instead of having:

/** The value is used for character storage. */
private final char value[];

java.lang.String now has:

private final byte[] value;
/**
 * The identifier of the encoding used to encode the bytes in
 * {@code value}. The supported values in this implementation are
 *
 * LATIN1
 * UTF16
 *
 * @implNote This field is trusted by the VM, and is a subject to
 * constant folding if String instance is constant. Overwriting this
 * field after construction will cause problems.
 */
private final byte coder;

In other words, this feature replaces the char array value (where each element uses 2 bytes) with a byte array with an extra byte to determine the encoding (Latin-1 or UTF-16). This means that for most application that use only Latin-1 characters, only half the previous amount of heap is used. This feature is completely invisible to the user, and related API such as StringBuilder automatically make use of it.

To demonstrate this change in terms of the size used by a String object, I’ll be using Java Object Layout, a simple utility that can be used to visualize the structure of an object in the heap. For that matter, we are interested in determining the footprint of the array (stored in the variable value above), and not simply the reference (both a byte array reference and a char array reference use 4 bytes). The following prints this information using a JOL GraphLayout:

public class JOLSample {

    public static void main(String[] args) {
        System.out.println(GraphLayout.parseInstance("abcdefghijklmnopqrstuvwxyzabcdefghijklmnopqrstuvwxyzabcdefghijklmnopqrstuvwxyzabcdefghijklmnopqrstuvwxyzabcdefghijklmnopqrstuvwxyzabcdefghijklmnopqrstuvwxyzabcdefghijklmnopqrstuvwxyzabcdefghijklmnopqrstuvwxyz").toFootprint());
    }
}

Running the above against Java 8 and then against Java 9 shows the difference:

$java -version
java version "1.8.0_121"
Java(TM) SE Runtime Environment (build 1.8.0_121-b13)
Java HotSpot(TM) 64-Bit Server VM (build 25.121-b13, mixed mode)

$java -cp lib\jol-cli-0.9-full.jar;. test.JOLSample
java.lang.String@4554617cd footprint:
     COUNT       AVG       SUM   DESCRIPTION
         1       432       432   [C
         1        24        24   java.lang.String
         2                 456   (total)

...

$java -version
java version "9"
Java(TM) SE Runtime Environment (build 9+181)
Java HotSpot(TM) 64-Bit Server VM (build 9+181, mixed mode)

$java -cp lib\jol-cli-0.9-full.jar;. test.JOLSample
java.lang.String@73035e27d footprint:
     COUNT       AVG       SUM   DESCRIPTION
         1       224       224   [B
         1        24        24   java.lang.String
         2                 248   (total)

Ignoring the 24-byte size of the internals of java.lang.String (header plus references), we see the size reduced to almost half with string compaction.

If we change the above String to use a UTF-16 character such as \u0780, and then re-run the above, both Java 8 and Java 9 show the same footprint because the compaction no longer occurs.

This feature can be disabled by passing the option -XX:-CompactStrings to the java command.

20 Examples of Using Java’s CompletableFuture

This post revisits Java 8’s CompletionStage API and specifically its implementation in the standard Java library, CompletableFuture. The API is explained by examples that illustrate the various behaviors, where each example focuses on a specific one or two behaviors.

Since the CompletableFuture class implements the CompletionStage interface, we first need to understand the contract of that interface. It represents a stage of a certain computation which can be done either synchronously or asynchronously. You can think of it as just a single unit of a pipeline of computations that ultimately generate a final result of interest. This means that several CompletionStages can be chained together so that one stage’s completion triggers the execution of another stage, which in turns triggers another, and so on.

In addition to implementing the CompletionStage interface, CompletableFuture also implements Future, which represents a pending asynchronous event, with the ability to explicitly complete this Future, hence the name CompletableFuture.

1. Creating a completed CompletableFuture

The simplest example creates an already completed CompletableFuture with a predefined result. Usually this may act as the starting stage in your computation.

static void completedFutureExample() {
    CompletableFuture<String> cf = CompletableFuture.completedFuture("message");
    assertTrue(cf.isDone());
    assertEquals("message", cf.getNow(null));
}

The getNow(null) returns the result if completed (which is obviously the case), otherwise returns null (the argument).

2. Running a simple asynchronous stage

The next example is how to create a stage that executes a Runnable asynchronously:

static void runAsyncExample() {
    CompletableFuture<Void> cf = CompletableFuture.runAsync(() -> {
        assertTrue(Thread.currentThread().isDaemon());
        randomSleep();
    });
    assertFalse(cf.isDone());
    sleepEnough();
    assertTrue(cf.isDone());
}

The takeaway of this example is two things:

  1. A CompletableFuture is executed asynchronously when the method typically ends with the keyword Async
  2. By default (when no Executor is specified), asynchronous execution uses the common ForkJoinPool implementation, which uses daemon threads to execute the Runnable task. Note that this is specific to CompletableFuture. Other CompletionStage implementations can override the default behavior.

3. Applying a Function on previous stage

The below example takes the completed CompletableFuture from example #1, which bears the result string "message", and applies a function that converts it to uppercase:

static void thenApplyExample() {
    CompletableFuture<String> cf = CompletableFuture.completedFuture("message").thenApply(s -> {
        assertFalse(Thread.currentThread().isDaemon());
        return s.toUpperCase();
    });
    assertEquals("MESSAGE", cf.getNow(null));
}

Note the behavioral keywords in thenApply:

  1. then, which means that the action of this stage happens when the current stage completes normally (without an exception). In this case, the current stage is already completed with the value “message”.
  2. Apply, which means the returned stage will apply a Function on the result of the previous stage.

The execution of the Function will be blocking, which means that getNow() will only be reached when the uppercase operation is done.

4. Asynchronously applying a Function on previous stage

By appending the Async suffix to the method in the previous example, the chained CompletableFuture would execute asynchronously (using ForkJoinPool.commonPool()).

static void thenApplyAsyncExample() {
    CompletableFuture<String> cf = CompletableFuture.completedFuture("message").thenApplyAsync(s -> {
        assertTrue(Thread.currentThread().isDaemon());
        randomSleep();
        return s.toUpperCase();
    });
    assertNull(cf.getNow(null));
    assertEquals("MESSAGE", cf.join());
}

5. Asynchronously applying a Function on previous stage using a custom Executor

A very useful feature of asynchronous methods is the ability to provide an Executor to use it to execute the desired CompletableFuture. This example shows how to use a fixed thread pool to apply the uppercase conversion Function:

static ExecutorService executor = Executors.newFixedThreadPool(3, new ThreadFactory() {
    int count = 1;
    @Override
    public Thread newThread(Runnable runnable) {
        return new Thread(runnable, "custom-executor-" + count++);
    }
});
static void thenApplyAsyncWithExecutorExample() {
    CompletableFuture<String> cf = CompletableFuture.completedFuture("message").thenApplyAsync(s -> {
        assertTrue(Thread.currentThread().getName().startsWith("custom-executor-"));
        assertFalse(Thread.currentThread().isDaemon());
        randomSleep();
        return s.toUpperCase();
    }, executor);
    assertNull(cf.getNow(null));
    assertEquals("MESSAGE", cf.join());
}

6. Consuming result of previous stage

If the next stage accepts the result of the current stage but does not need to return a value in the computation (i.e. its return type is void), then instead of applying a Function, it can accept a Consumer, hence the method thenAccept:

static void thenAcceptExample() {
    StringBuilder result = new StringBuilder();
    CompletableFuture.completedFuture("thenAccept message")
            .thenAccept(s -> result.append(s));
    assertTrue("Result was empty", result.length() > 0);
}

The Consumer will be executed synchronously, so we don’t need to join on the returned CompletableFuture.

7. Asynchronously consuming result of previous stage

Again, using the async version of thenAccept, the chained CompletableFuture would execute asynchronously:

static void thenAcceptAsyncExample() {
    StringBuilder result = new StringBuilder();
    CompletableFuture<Void> cf = CompletableFuture.completedFuture("thenAcceptAsync message")
            .thenAcceptAsync(s -> result.append(s));
    cf.join();
    assertTrue("Result was empty", result.length() > 0);
}

8. Completing a computation exceptionally

Now let us see how an asynchronous operation can be explicitly completed exceptionally, indicating a failure in the computation. For simplicity, the operation takes a string and converts it to upper case, and we simulate a delay in the operation of 1 second. To do that, we will use the thenApplyAsync(Function, Executor) method, where the first argument is the uppercase function, and the executor is a delayed executor that waits for 1 second before actually submitting the operation to the common ForkJoinPool.

static void completeExceptionallyExample() {
    CompletableFuture<String> cf = CompletableFuture.completedFuture("message").thenApplyAsync(String::toUpperCase,
            CompletableFuture.delayedExecutor(1, TimeUnit.SECONDS));
    CompletableFuture<String> exceptionHandler = cf.handle((s, th) -> { return (th != null) ? "message upon cancel" : ""; });
    cf.completeExceptionally(new RuntimeException("completed exceptionally"));
assertTrue("Was not completed exceptionally", cf.isCompletedExceptionally());
    try {
        cf.join();
        fail("Should have thrown an exception");
    } catch(CompletionException ex) { // just for testing
        assertEquals("completed exceptionally", ex.getCause().getMessage());
    }
    assertEquals("message upon cancel", exceptionHandler.join());
}

Let’s examine this example in detail:

  • First, we create a CompletableFuture that is already completed with the value "message". Next we call thenApplyAsync which returns a new CompletableFuture. This method applies an uppercase conversion in an asynchronous fashion upon completion of the first stage (which is already complete, thus the Function will be immediately executed). This example also illustrates a way to delay the asynchronous task using the delayedExecutor(timeout, timeUnit) method.
  • We then create a separate “handler” stage, exceptionHandler, that handles any exception by returning another message "message upon cancel".
  • Next we explicitly complete the second stage with an exception. This makes the join() method on the stage, which is doing the uppercase operation, throw a CompletionException (normally join() would have waited for 1 second to get the uppercase string). It will also trigger the handler stage.

9. Canceling a computation

Very close to exceptional completion, we can cancel a computation via the cancel(boolean mayInterruptIfRunning) method from the Future interface. For CompletableFuture, the boolean parameter is not used because the implementation does not employ interrupts to do the cancelation. Instead, cancel() is equivalent to completeExceptionally(new CancellationException()).

static void cancelExample() {
    CompletableFuture<String> cf = CompletableFuture.completedFuture("message").thenApplyAsync(String::toUpperCase,
            CompletableFuture.delayedExecutor(1, TimeUnit.SECONDS));
    CompletableFuture<String> cf2 = cf.exceptionally(throwable -> "canceled message");
    assertTrue("Was not canceled", cf.cancel(true));
    assertTrue("Was not completed exceptionally", cf.isCompletedExceptionally());
    assertEquals("canceled message", cf2.join());
}

10. Applying a Function to result of either of two completed stages

The below example creates a CompletableFuture that applies a Function to the result of either of two previous stages (no guarantees on which one will be passed to the Function). The two stages in question are: one that applies an uppercase conversion to the original string, and another that applies a lowercase conversion:

static void applyToEitherExample() {
    String original = "Message";
    CompletableFuture<String> cf1 = CompletableFuture.completedFuture(original)
            .thenApplyAsync(s -> delayedUpperCase(s));
    CompletableFuture<String> cf2 = cf1.applyToEither(
            CompletableFuture.completedFuture(original).thenApplyAsync(s -> delayedLowerCase(s)),
            s -> s + " from applyToEither");
    assertTrue(cf2.join().endsWith(" from applyToEither"));
}

11. Consuming result of either of two completed stages

Similar to the previous example, but using a Consumer instead of a Function (the dependent CompletableFuture has a type void):

static void acceptEitherExample() {
    String original = "Message";
    StringBuffer result = new StringBuffer();
    CompletableFuture<Void> cf = CompletableFuture.completedFuture(original)
            .thenApplyAsync(s -> delayedUpperCase(s))
            .acceptEither(CompletableFuture.completedFuture(original).thenApplyAsync(s -> delayedLowerCase(s)),
                    s -> result.append(s).append("acceptEither"));
    cf.join();
    assertTrue("Result was empty", result.toString().endsWith("acceptEither"));
}

Notice here the usage of the thread-safe StringBuffer instead of StringBuilder.

12. Running a Runnable upon completion of both stages

This example shows how the dependent CompletableFuture that executes a Runnable triggers upon completion of both of two stages. Note all below stages run synchronously, where a stage first converts a message string to uppercase, then a second converts the same message string to lowercase.

static void runAfterBothExample() {
    String original = "Message";
    StringBuilder result = new StringBuilder();
    CompletableFuture.completedFuture(original).thenApply(String::toUpperCase).runAfterBoth(
            CompletableFuture.completedFuture(original).thenApply(String::toLowerCase),
            () -> result.append("done"));
    assertTrue("Result was empty", result.length() > 0);
}

13. Accepting results of both stages in a BiConsumer

Instead of executing a Runnable upon completion of both stages, using BiConsumer allows processing of their results if needed:

static void thenAcceptBothExample() {
    String original = "Message";
    StringBuilder result = new StringBuilder();
    CompletableFuture.completedFuture(original).thenApply(String::toUpperCase).thenAcceptBoth(
            CompletableFuture.completedFuture(original).thenApply(String::toLowerCase),
            (s1, s2) -> result.append(s1 + s2));
    assertEquals("MESSAGEmessage", result.toString());
}

14. Applying a BiFunction on results of both stages

If the dependent CompletableFuture is intended to combine the results of two previous CompletableFutures by applying a function on them and returning a result, we can use the method thenCombine(). The entire pipeline is synchronous, so getNow() at the end would retrieve the final result, which is the concatenation of the uppercase and the lowercase outcomes.

static void thenCombineExample() {
    String original = "Message";
    CompletableFuture<String> cf = CompletableFuture.completedFuture(original).thenApply(s -> delayedUpperCase(s))
            .thenCombine(CompletableFuture.completedFuture(original).thenApply(s -> delayedLowerCase(s)),
                    (s1, s2) -> s1 + s2);
    assertEquals("MESSAGEmessage", cf.getNow(null));
}

15. Asynchronously applying a BiFunction on results of both stages

Similar to the previous example, but with a different behavior: since the two stages upon which CompletableFuture depends both run asynchronously, the thenCombine() method executes asynchronously, even though it lacks the Async suffix. This is documented in the class Javadocs: “Actions supplied for dependent completions of non-async methods may be performed by the thread that completes the current CompletableFuture, or by any other caller of a completion method.” Therefore, we need to join() on the combining CompletableFuture to wait for the result.

static void thenCombineAsyncExample() {
    String original = "Message";
    CompletableFuture<String> cf = CompletableFuture.completedFuture(original)
            .thenApplyAsync(s -> delayedUpperCase(s))
            .thenCombine(CompletableFuture.completedFuture(original).thenApplyAsync(s -> delayedLowerCase(s)),
                    (s1, s2) -> s1 + s2);
    assertEquals("MESSAGEmessage", cf.join());
}

16. Composing CompletableFutures

We can use composition using thenCompose() to accomplish the same computation done in the previous two examples. This method waits for the first stage (which applies an uppercase conversion) to complete. Its result is passed to the specified Function which returns a CompletableFuture, whose result will be the result of the returned CompletableFuture. In this case, the Function takes the uppercase string (upper), and returns a CompletableFuture that converts the original string to lowercase and then appends it to upper.

static void thenComposeExample() {
    String original = "Message";
    CompletableFuture<String> cf = CompletableFuture.completedFuture(original).thenApply(s -> delayedUpperCase(s))
            .thenCompose(upper -> CompletableFuture.completedFuture(original).thenApply(s -> delayedLowerCase(s))
                    .thenApply(s -> upper + s));
    assertEquals("MESSAGEmessage", cf.join());
}

17. Creating a stage that completes when any of several stages completes

The below example illustrates how to create a CompletableFuture that completes when any of several CompletableFutures completes, with the same result. Several stages are first created, each converting a string from a list to uppercase. Because all of these CompletableFutures are executing synchronously (using thenApply()), the CompletableFuture returned from anyOf() would execute immediately, since by the time it is invoked, all stages are completed. We then use the whenComplete(BiConsumer action), which processes the result (asserting that the result is uppercase).

static void anyOfExample() {
    StringBuilder result = new StringBuilder();
    List<String> messages = Arrays.asList("a", "b", "c");
    List<CompletableFuture<String>> futures = messages.stream()
            .map(msg -> CompletableFuture.completedFuture(msg).thenApply(s -> delayedUpperCase(s)))
            .collect(Collectors.toList());
    CompletableFuture.anyOf(futures.toArray(new CompletableFuture[futures.size()])).whenComplete((res, th) -> {
        if(th == null) {
            assertTrue(isUpperCase((String) res));
            result.append(res);
        }
    });
    assertTrue("Result was empty", result.length() > 0);
}

18. Creating a stage that completes when all stages complete

The next two examples illustrate how to create a CompletableFuture that completes when all of several CompletableFutures completes, in a synchronous and then asynchronous fashion, respectively. The scenario is the same as the previous example: a list of strings is provided where each element is converted to uppercase.

static void allOfExample() {
    StringBuilder result = new StringBuilder();
    List<String> messages = Arrays.asList("a", "b", "c");
    List<CompletableFuture<String>> futures = messages.stream()
            .map(msg -> CompletableFuture.completedFuture(msg).thenApply(s -> delayedUpperCase(s)))
            .collect(Collectors.toList());
    CompletableFuture.allOf(futures.toArray(new CompletableFuture[futures.size()])).whenComplete((v, th) -> {
        futures.forEach(cf -> assertTrue(isUpperCase(cf.getNow(null))));
        result.append("done");
    });
    assertTrue("Result was empty", result.length() > 0);
}

19. Creating a stage that completes asynchronously when all stages complete

By switching to thenApplyAsync() in the individual CompletableFutures, the stage returned by allOf() gets executed by one of the common pool threads that completed the stages. So we need to call join() on it to wait for its completion.

static void allOfAsyncExample() {
    StringBuilder result = new StringBuilder();
    List<String> messages = Arrays.asList("a", "b", "c");
    List<CompletableFuture<String>> futures = messages.stream()
            .map(msg -> CompletableFuture.completedFuture(msg).thenApplyAsync(s -> delayedUpperCase(s)))
            .collect(Collectors.toList());
    CompletableFuture<Void> allOf = CompletableFuture.allOf(futures.toArray(new CompletableFuture[futures.size()]))
            .whenComplete((v, th) -> {
                futures.forEach(cf -> assertTrue(isUpperCase(cf.getNow(null))));
                result.append("done");
            });
    allOf.join();
    assertTrue("Result was empty", result.length() > 0);
}

20. Real life example

Now that the functionality of CompletionStage and specifically CompletableFuture is explored, the below example applies them in a practical scenario:

  1. First fetch a list of Car objects asynchronously by calling the cars() method, which returns a CompletionStage<List<Car>>. The cars() method could be consuming a remote REST endpoint behind the scenes.
  2. We then compose another CompletionStage that takes care of filling the rating of each car, by calling the rating(manufacturerId) method which returns a CompletionStage<Float> that asynchronously fetches the car rating (again could be consuming a REST endpoint).
  3. When all Car objects are filled with their rating, we end up with a List<CompletionStage<Car>>, so we call allOf() to get a final stage (stored in variable done) that completes upon completion of all these stages.
  4. Using whenComplete() on the final stage, we print the Car objects with their rating.
cars().thenCompose(cars -> {
    List<CompletionStage<Car>> updatedCars = cars.stream()
            .map(car -> rating(car.manufacturerId).thenApply(r -> {
                car.setRating(r);
                return car;
            })).collect(Collectors.toList());
    CompletableFuture<Void> done = CompletableFuture
            .allOf(updatedCars.toArray(new CompletableFuture[updatedCars.size()]));
    return done.thenApply(v -> updatedCars.stream().map(CompletionStage::toCompletableFuture)
            .map(CompletableFuture::join).collect(Collectors.toList()));
}).whenComplete((cars, th) -> {
    if (th == null) {
        cars.forEach(System.out::println);
    } else {
        throw new RuntimeException(th);
    }
}).toCompletableFuture().join();

Since the Car instances are all independent, getting each rating asynchronously improves performance. Furthermore, waiting for all car ratings to be filled is done using a more natural allOf() method, as opposed to manual thread waiting (e.g. using Thread#join() or a CountDownLatch).

Working through these examples helps better understand this API. You can view the full code of these examples on GitHub.

What Is Project Amber in Java?

In this post, we’re going to delve into some details of the features being targeted in Project Amber, which was introduced in early 2017 by its lead and language architect Brian Goetz. This project aims to add some really cool beans to the Java programming language that improve the developer’s productivity when writing Java code, namely:

As this is still work in progress, other features could be added to the project in the future. Even though these features may seem to have been addressed late in the Java timeline, it’s worth considering that the Java team has historically been rather cautious in introducing new features to evolve the language, as Goetz explains in a talk about the project.

Local-variable type inference

In Java 5 generics were introduced with the possibility for the compiler to infer type arguments during generic method calls, as shown in the below example:

private <T> void foo(T t) {
    ...
}

public void bar() {
    this.foo(1);  // with implicit type, compiler infers type argument
    this.<Integer>foo(1); // with explicit typing
}

Further enhancements to type inference were done over the next releases, including the diamond operator in Java 7, enhancements in Java 8 along with lambda and stream support, and in Java 9 allowing the diamond operator in anonymous classes when the inferred type is denotable. With this feature (specified in JEP 286), the compiler will be able to infer declaration types of local variables, subject to certain limitations. The main requirement for the compiler is that the initializer needs to be included with the variable declaration. With this enhancement, a statement like:

File inputFile = new File("input.txt");

could be written as:

var inputFile = new File("input.txt");

Like any other form of type inference, the main benefit is avoiding the redundant typing of the variable type when it can be easily known from the right hand side of the assignment. It is important to remember here that the var keyword does not mean that the variable is dynamically typed. It is just a syntax to avoid writing the manifest type of the local variable; the static typing nature of Java remains intact. Strictly speaking, var is a reserved type name that gets desugared to the variable initializer type by the compiler.

Not every form of local variable declaration can use var to infer the declaration or manifest type of the variable. The following cases do not allow the use of var:

  • Local variables without initializers, such as File inputFile;
  • Local variables initialized to null.
  • Initializers that expect a target type, such as a lambda, a method reference or an array initializer.

As such, below are examples where type inference is not allowed:

// not allowed, lambda expression needs an explicit target-type
var func = s -> Integer.valueOf(s);

// not allowed, method reference needs an explicit target-type
var biConsumer = LogProcessor::process;

// not allowed, array initializer needs an explicit target-type
var array = { 1, 2 };

The majority of local variable declarations in typical code could benefit from this feature. For example, in the OpenJDK codebase, only 13% of local variables cannot be re-written using var. Therefore, the cost of broadening local type inference to include cases like the above may be too high compared to the amount of applicable code that can further benefit from it.

This feature is included in the planned Java 10 release, which is expected to be available in March 2018.

Enhanced enums

This feature enhances enums in two aspects. First, it allows declaring a generic enum, which combines the flexibility and type safety of generics with the simplicity and powerful semantics of an enum. Second, it enhances enums so that an enum constant that is declared as generic or overrides behavior via a class body gets its own type information, along with its own state and behavior.

In some use cases, we may need to define enum constants where each is bound to a certain type. A typical example is an enum that contains mappings to Java types, where a generic enum can be used shown in the below JsonType example:

public enum JsonType<T> {
    STRING<String>(String.class),
    LONG<Long>(Long.class),
    DOUBLE<>(Double.class), // can use a diamond operator to infer
    BOOLEAN<>(Boolean.class),
    ...

    final Class<T> mappedClass;

    JsonType(Class<T> mappedClass) {
        this.mappedClass = mappedClass;
    }

    public T convert(Object o) {
        ...
    }
}

In this case, the enum constant STRING has a sharper type JsonType<String>, enum constant LONG is of type JsonType<Long>, and so on. One could further customize each enum constant with additional state and/or methods:

public enum JsonType<T> {
    STRING<>(String.class),

    // LONG is has an anonymous class as type now,
    // we can use a diamond as long as inferred type is denotable
    LONG<>(Long.class) {
        public String desc = "Long JSON type";

        public boolean isLongValue(JSONValue value) {
            ...
        }
    },
    DOUBLE<>(Double.class),
    BOOLEAN<>(Boolean.class),
    ...
}

Since the enum constant LONG has a class body, its type is an anonymous class whose supertype is JsonType<Long>.

This feature is discussed more in JEP 301 which still has a “Candidate” status, so not all risks may have been addressed and is not expected to reach JDK 10.

Enhancements to lambda expressions

These are a couple of additional features added to lambda along with improving type inference for methods involving lambdas as arguments. The first feature is the ability to use an underscore to denote an unused parameter in a lambda:

BiFunction<Integer, String, String> biss = (i, _) -> String.valueOf(i);

As of Java 9, an underscore can no longer be used as an identifier, and with this feature it now carries a special meaning in the context of lambdas.

The second feature introduced in this JEP for lambdas is the ability to shadow variables declared in the enclosing scope of a lambda by re-using the same variable names to declare the lambda parameters:

int i = 0;
// can declare lambda parameter named i, shadowing the local variable i
BiFunction<Integer, String, String> biss = (i, _) -> String.valueOf(i);

Currently it is not allowed to re-use i in the lambda expression because lambdas are lexically scoped and generally do not allow shadowing variables. Last but not least, improving overload resolution for methods invoked with either a lambda or a method reference as argument is optionally targeted in this project. This should fix false compilation errors that may be commonly encountered when writing methods that accept functional interfaces:

m(Predicate<String> ps) { ... }
m(Function<String, String> fss) { ... }

m(s -> false) // error due to ambiguity, although Predicate
              // should have been inferred

class Foo {
    static boolean g(String s) { return false }
    static boolean g(Integer i) { return false }
}

m(Foo::g) // error due to ambiguity, although boolean g(String s)
          // should have been selected

Pattern matching

The next feature in the Amber project introduces a powerful construct called a pattern. The motivation behind this feature is the commonly used boilerplate code shown below:

String content = null;

if (msg instanceof JsonMessage) {

    content = unmarshalJson((JsonMessage) msg);

} else if (msg instanceof XmlMessage) {

    content = unmarshalXml((XmlMessage) msg);

} else if (msg instanceof PlainTextMessage) {

    content = ((PlainTextMessage) msg).getText();

} ...

Each condition branch checks if the object is of a certain type, then casts it to that type and extracts some information from it. Pattern matching is a generalization of this “test-extract-bind” technique and can be defined as:

  • a predicate that can be applied to a target
  • a set of binding variables that are extracted from the object matching the predicate

Instead of the above, we could apply a type-test pattern on the object msg using a new matches operator. As a first step, this would remove the redundant cast:

String content = null;

if (msg matches JsonMessage json) {

    content = unmarshalJson(json);

} else if (msg matches XmlMessage xml) {

    content = unmarshalXml(xml);

} else if (msg matches PlainTextMessage text) {

    content = text.getText();

} ...

The existing switch statement already makes use of the simplest form of patterns: the constant pattern. Given an object whose type is allowed in a switch statement, we test the object if it matches any of several constant expressions. Now the switch statement would also benefit from type-test patterns:

String content;

switch (msg) {

    case JsonMessage json:      content = unmarshalJson(json); break;

    case XmlMessage xml:        content = unmarshalXml(xml); break;

    case PlainTextMessage text: content = text.getText(); break;

    ...

    default:                    content = msg.toString();
}

This switch could be now be considered a “type switch” but it’s actually a generalized switch that can take other types of patterns; in this example, type-test patterns. In addition to generalizing a switch statement, this feature suggests a further improvement by allowing a switch to be also used as an expression instead of a statement, making the above look even more readable:

String content = switch (msg) {

    case JsonMessage json      -> unmarshalJson(json);

    case XmlMessage xml        -> unmarshalXml(xml);

    case PlainTextMessage text -> text.getText();

    ...

    default                    -> msg.toString();
}

Another kind of a pattern that can be used for matching and that is further proposed in this JEP is a deconstruction pattern. It matches an expression against a certain type, and extracts variables based on the signature of an existing constructor in the matched type:

// Using a deconstruction pattern with nested type patterns
if (item matches Book(String isbn, int year)) {
    // do something with isbn and published
}

What’s really nice about this is that the component String isbn is itself a type-test pattern that matches the isbn property of the Book object against a String and extracts it into the isbn variable, and the same for the int year pattern. This means patterns may be nested within each other. Another example is nesting a constant pattern in a deconstruction pattern:

// Using a deconstruction pattern with a nested constant pattern
if (item matches Book("978-0321349606")) {
    ...
}

Finally, within a future work scope of this JEP are sealed types, which allow defining types whose subtypes can be limited by the programmer. With this feature, a type could be marked as “sealed” to mean that the subtypes are restricted to a known set. It is similar to a final type, but instead gives the programmer a way to restrict the hierarchy of child types. For example, in an bookstore application we may only need to handle certain items like books, DVDs, etc. In this case we could seal our BookstoreItem parent class. This can be very useful because it removes the burden of handling default cases whenever we are switching over the possible subtypes.

Data classes

A lot of times all that a class is responsible of is holding data. And with the current way to writing such classes, we usually end up writing too much boilerplate to customize methods based on the state of the object, e.g. by overriding equals(), hashCode(), toString(), etc. Furthermore, there is nothing in the language that just tells the compiler or the reader that this class is a simple data holder class.

In order to define such semantics, this feature seeks to introduce data classes of the following form (syntax and semantics still under discussion; for a comprehensive discussion see this document on the OpenJDK site):

__data class Point(int x, int y) { }

which would be translated into the following at compile time:

final class Point extends java.lang.DataClass {
    final int x;
    final int y;

    public Point(int x, int y) {
        this.x = x;
        this.y = y;
    }

    // destructuring pattern for Point(int x, int y)
    // state-based equals, hashCode, and toString
    // public read accessors for x and y
}

The general idea is to have the compiler generate all that boilerplate for the programmer (similar to what is done with enums), and have the programmer still able to override methods like equals() or implementing interfaces. At this point, some design decisions are in progress, for example it is undecided whether immutability will be enforced or if mutability could be allowed, which would definitely impact the implementation of this feature along with the thread-safety of such classes.

Summary

Project Amber aims to bring features that can make writing Java code more readable and concise, and target specific use cases such as using generic enums or data classes. Local variable type inference enables the programmer to defer thinking about the variable type to whenever it is initialized. Enhanced enums allows a more flexible approach to solving specific problems with less code. Lambda leftovers improves lambda support with a couple of small changes. Pattern matching provides a powerful construct to writing conditional logic and reduces boilerplate coding. And finally data classes allow the programmer to segregate plain data carriers from other classes. So far, only local variable type inference is planned in the Java 10 release, but with the accelerated release timeline of Java, the others can be rolled out as soon as they are ready.

15 Productivity Tips for Eclipse Java IDE Users

With over 10 years of releases and countless extensions and plugins, Eclipse remains one of the most popular IDEs for developers working across several domains. Especially those in the Java ecosystem, where Eclipse provides a solid environment for developing, debugging and running applications. In this post, I’d like to share my favorite features in Eclipse that help me be more productive in my daily work as a Java developer. These features don’t require any plugin to be installed if the very first tip is followed.

1. Use Eclipse Oxygen

There are many improvements in the last release of Eclipse alone, and with the latest build released just a few days ago, the IDE supports Java 9 out of the box. Some of these improvements are:

  • Showing the last returned value while debugging a Java program. This shows you the value returned by the last method after stepping through the program statements.
  • Better Java 8 support, with numerous bug fixes for lambda expression type inference.
  • A new Java index that significantly reduces tooling performance, such as when loading the type hierarchy of platform classes and interfaces.
  • Support for JUnit 5.

You can find a list of Java tooling improvements in Oxygen here.

2. Switch editors using Ctrl+Tab

If you’re used to switching tabs in browsers and editors like Notepad++, then do yourself a favor and change the keybinding for switching between Java source files. Go to Window -> Preferences -> Keys, then search for “Next editor” and “Previous editor”, and override their bindings to Ctrl+Tab and Ctrl+Shift+Tab respectively (note: I’m using Windows).

3. Group related projects in working sets before choosing multiple workspaces

If you work on many different projects, at some point you may need to use multiple workspaces to separate them. But before reaching that level, you can just group related projects into a working set. This way you don’t have to switch workspaces or have two Eclipse windows using different workspaces. It also keeps your projects organized and accessible from within the same view. For example, I typically keep a working set for sample projects for quick experimentation, and then typically a working set for each group of related modules in a Maven project. One thing that you may need to do is change the Package Explorer view to view these working sets as shown below.

Image title

I often end up with many working sets containing projects I’m not using. In this case, I can simply close a working set by right-clicking on it from the Package Explorer, and selecting Close Project. This reduces memory consumption in the IDE and makes it as if these closed projects do not exist in your workspace anymore until you re-open them. Only when I have too many working sets, or I have projects that considerably differ from each other that I rarely switch between, then I separate them in different workspaces.

4. Set the “incremental” option in the search dialog

When you hit Ctrl+F to find text in a source file, check the Incremental checkbox in the search dialog to make the occurrence of the searched text appear as you type. This seemingly minor detail helps me avoid typing too many characters and then hitting return to find what I want.

Image title

5. Use navigation and search shortcuts

A few shortcuts to help understanding your code (using Windows). These are so useful that eventually they’ll easily become second nature:

  • F3 or Ctrl+Left click: goes to declaration of element
  • Ctrl+T: view type hierarchy and implementation methods
  • Ctrl+Alt+H: view call hierarchy of selected element
  • Ctrl+Shift+G: search workspace for all references to selected element
  • Ctrl+Shift+T: search for a class, interface or enum
  • Ctrl+Shift+R: search for a resource (e.g. text file)

6. Use the File Search feature

This is really helpful if you want to search files in your workspace for text. The search can be filtered by file type and scope of the search, such as searching only the selected project.

Image title

7. Use Ctrl+Space and Ctrl+1 for content assist and quick fixes

Ctrl+Space allows for auto-completion. It can also be used to override methods and generate getters /setters and constructors.

Ctrl+1 can be very handy in quick and smart fixes such as:

  • assigning constructor parameters to new or existing class fields
  • assigning a statement to a local variable
  • renaming a variable, field or class, etc.

8. Use code generation actions

Alt+Shift+S can be used to quickly add common code:

  • generating getters/setters and constructors
  • overriding hashCode() and equals()
  • overriding toString()

9. Ctrl+3 is your friend

As with any modern IDE, there are many keybindings to do all sorts of actions in Eclipse. But the most important is probably Ctrl+3 for Quick Access which is an entry point to virtually all actions you can do. I typically use it to open a view, but it can also be used to do refactoring, creating a new project, and lots of others.

10. Download the sources of libraries

If you’re using Maven, you can download the source code of your dependencies. There is preference under Window -> Preferences -> Maven that when selected automatically fetches the source artifacts of dependencies. You can also download sources manually by right-clicking on the dependency in the Maven Dependencies tree and selecting Maven -> Download Sources. Usually this also makes Javadoc comments available in your IDE when you hit F2, so you no longer need to browse it separately. There is similar way to do this in Gradle.

11. Use shortcuts to run, debug and inspect code

These again should become second nature while debugging:

  • Ctrl+F11 to run the last application launched
  • F11 to debug the last application launched
  • F5 to step into
  • F6 to step over, i.e. go to next line
  • F7 to step return to caller
  • F8 to resume until next breakpoint
  • Ctrl+Shit+I to evaluate selected expression
  • Use the Display view to write and execute code within the current debug context

12. Pinpoint program suspension with conditional breakpoints and watchpoints

Often you can make your program suspend on a line of code only when a certain condition is met. This reduces time spent on debugging, as long as you don’t overuse the feature (too many breakpoints, especially conditional ones, can make the program run slower in debug mode; in this case, you can either disable or delete unneeded breakpoints).

Image title

13. Save your run configurations for later re-use

I often need to build multi-module projects with different parameters, or run unit tests for a specific project, or configure some parameters for running a main class. Instead of switching to the command line, take the time to configure an appropriate run or debug configuration within the IDE. Ideally I never want to have a separate command line and everything should be done in the IDE, especially that it comes with all major build tools and SCM plugins already bundled.

14. Leverage code coverage support

In Eclipse Oxygen, the Eclipse EclEmma tool based on the JaCoCo code coverage library is integrated as part of the IDE, which allows you to have information on code coverage when running your unit tests. To run a program or unit test with coverage, right-click on the class to run and select Coverage As -> Java Application or JUnit Test.

15. For large workspaces with lots of dependent projects, disable Build Automatically

If you have lots of projects that depend on each other, the Build Automatically default behavior can be time-consuming because it would trigger an “internal” build upon saving. In this case, you can uncheck it from under the Project menu, which makes you in control of when to manually build your project. For example, after saving all needed modifications, the developer can manually do the internal build using Ctrl+B or using Project -> Build All, or do a full build from scratch using whatever build tool he or she is using.

Conclusion

And those were 15 habbits for improving productivity which I hope to be useful for Java developers using Eclipse! Of course many of them may depend on the developer’s preferences, and there are others that are not mentioned.

Check out what’s new in Eclipse Oxygen for Java developers. You can also follow the Eclipse Java IDE for more tips and features.