Thread-safety of an Iterator Over a Stream of SecureRandom Values

I recently experienced an interesting scenario involving Java streams which was a bit surprising, or at least unexpected. Maybe I was unwary in my implementation, but it still gave me another reason to consider things before using streams. Not that streams are bad, on the contrary, I think they are a great feature in the Java language and very cool to use, in the right place though.

The need was the following: provide a mechanism to indefinitely generate unique IDs that are “secure”, in the sense that they are hard to predict. At any point in time, an ID needs to be generated and handed over to a client. To implement this, the Java platform’s SecureRandom felt like the best way to do it. It provides random values that strong from a security standpoint, supports a very wide range values, and is thread-safe.

The problem is that even if the range is very big (say you’re generating long values, so you have 264 values), this may still not be enough and you want to ensure no duplicate values are even generated. One way to do this is to store values in some structure such as a concurrent set (you could generate one using a ConcurrentHashMap). It turns out this was a bit more complicated to implement than I would have thought, the exact reasons being beyond the scope here, but basically that structure had to be managed throughout a complex lifecycle (e.g. need to clean up unused values).

After checking the SecureRandom class again, a simpler way of implementing this could be to leverage its stream support. Specifically the longs() method inherited by its Random superclass would return “an effectively unlimited stream of pseudorandom long values”, in the form of a LongStream. Like any other stream, intermediate operations could be added, such as distinct(), which is what we want here. Since I want to be able to generate a value from this stream at any point, the iterator() method, which is a terminal operation, would be added to build our stream pipeline:

Iterator<Long> iterator = new SecureRandom().longs.distinct().iterator();

That definitely looks more neat. No need to manage a separate data structure. Furthermore, the docs of the longs() method states that “a pseudorandom long value is generated as if it’s the result of calling the method nextLong(). So it’s as if I’m just asking the SecureRandom to generate for me a next value each time I iterate over the stream.

Unfortunately it turns out this one-line approach is too good to be a true solution for my problem. The code was no longer thread-safe. A simple multithreaded program involving this stream would generate all kinds of race condition errors. The stream and its iterator derived from a thread-safe object are not thread-safe themselves, so you would need to synchronize access to the iterator. Adding a synchronized block was an acceptable solution for my case, but in others using a concurrent set could have been better.

Conclusion

The main takeaway here is that while a SecureRandom is thread-safe, an iterator over the elements of a stream derived from it may not necessarily be thread-safe. Never assume things that aren’t explicitly stated in the documentation until it is tested: even if the documentation says the stream generates a value by using the existing functionality or method of the thread-safe object, the iterator itself ended up being not thread-safe. Stream pipelines can hide important aspects of your code, such as thread-safety, which can end up in throwing exceptions with a bunch of stream low-level code in their stack traces, which are difficult to understand. Often the hiding of implementation aspects is desirable, but I should at least think about what these aspects are, because there is a lot happening under the hood.

A First Look at Records in Java 14

The upcoming release of Java will be version 14 scheduled to be in general availability in March 2020. Similar to the already released versions under the new 6-month release cycle, JDK 14 is expected to have several new features at both the language and JVM levels. If we look at the feature list, however, we notice quite a few language features that are highly anticipated by developers: records, switch expressions (which exists in JDK 13 but in preview mode) and pattern matching. Let’s have a look at records which seems to be an interesting addition to the language.

Prerequisites

All what we’re going to need is the JDK 14 Early-Access binary from the OpenJDK website: https://jdk.java.net/14/.

What is a record?

A record is basically a “data class”, a special kind of class that is intended to hold pure data in it. The semantics of records already exist in similar constructs in other languages such as data classes in Kotlin. By declaring a type as a record, the developer is clearly expressing their intention that the type represents only data. The syntax for declaring a record is much simpler and concise, compared to using a normal class where you typically need to implement core Object methods like equals() and hashCode() (often referred to as “boilerplate” code). Records seem to be an interesting choice when modeling things like domain model classes (potentially to be persisted via ORM), or data transfer objects (DTOs).

A good way to think of how records are implemented in the language is to remember enums. An enum is also a class that has special semantics with a nicer syntax. Since both are still classes, many of the features available in classes are preserved, so there is a balance between simplicity and flexibility in their design.

Records are a preview language feature, which means that, although it is fully implemented, it is not yet standardized in the JDK and can only be used by activating a flag. Preview languages features can be updated or even removed in future versions. Similar to switch expressions, it may become final and permanent in a future version.

A record example

Here’s an example of how a basic record looks like:

package examples;

record Person (String firstName, String lastName) {}

We have a Person record defined in a package with two components: firstName and lastName, and an empty body.

Let’s try to compile it — notice the --enable-preview option:

> javac --enable-preview --release 14 Person.java
Note: Person.java uses preview language features.
Note: Recompile with -Xlint:preview for details.

How does it look under the hood?

As mentioned previously, a record is just a class with the purpose of holding and exposing data. Let’s have a look at the generated bytecode with the javap tool:

>javap -v -p Person.class
Classfile examples/Person.class
  Last modified Dec 22, 2019; size 1273 bytes
  SHA-256 checksum 6f1b325121ca32a0b6127180eff29dcac4834f9c138c9613c526a4202fef972f
  Compiled from "Person.java"
final class examples.Person extends java.lang.Record
  minor version: 65535
  major version: 58
  flags: (0x0030) ACC_FINAL, ACC_SUPER
  this_class: #8                          // examples/Person
  super_class: #2                         // java/lang/Record
  interfaces: 0, fields: 2, methods: 6, attributes: 4
Constant pool:
   #1 = Methodref          #2.#3          // java/lang/Record."":()V
   #2 = Class              #4             // java/lang/Record
   #3 = NameAndType        #5:#6          // "":()V
   #4 = Utf8               java/lang/Record
   #5 = Utf8               
   #6 = Utf8               ()V
   #7 = Fieldref           #8.#9          // examples/Person.firstName:Ljava/lang/String;
   #8 = Class              #10            // examples/Person
   #9 = NameAndType        #11:#12        // firstName:Ljava/lang/String;
  #10 = Utf8               examples/Person
  #11 = Utf8               firstName
  #12 = Utf8               Ljava/lang/String;
  #13 = Fieldref           #8.#14         // examples/Person.lastName:Ljava/lang/String;
  #14 = NameAndType        #15:#12        // lastName:Ljava/lang/String;
  #15 = Utf8               lastName
  #16 = Fieldref           #8.#9          // examples/Person.firstName:Ljava/lang/String;
  #17 = Fieldref           #8.#14         // examples/Person.lastName:Ljava/lang/String;
  #18 = InvokeDynamic      #0:#19         // #0:toString:(Lexamples/Person;)Ljava/lang/String;
  #19 = NameAndType        #20:#21        // toString:(Lexamples/Person;)Ljava/lang/String;
  #20 = Utf8               toString
  #21 = Utf8               (Lexamples/Person;)Ljava/lang/String;
  #22 = InvokeDynamic      #0:#23         // #0:hashCode:(Lexamples/Person;)I
  #23 = NameAndType        #24:#25        // hashCode:(Lexamples/Person;)I
  #24 = Utf8               hashCode
  #25 = Utf8               (Lexamples/Person;)I
  #26 = InvokeDynamic      #0:#27         // #0:equals:(Lexamples/Person;Ljava/lang/Object;)Z
  #27 = NameAndType        #28:#29        // equals:(Lexamples/Person;Ljava/lang/Object;)Z
  #28 = Utf8               equals
  #29 = Utf8               (Lexamples/Person;Ljava/lang/Object;)Z
  #30 = Utf8               (Ljava/lang/String;Ljava/lang/String;)V
  #31 = Utf8               Code
  #32 = Utf8               LineNumberTable
  #33 = Utf8               MethodParameters
  #34 = Utf8               ()Ljava/lang/String;
  #35 = Utf8               ()I
  #36 = Utf8               (Ljava/lang/Object;)Z
  #37 = Utf8               SourceFile
  #38 = Utf8               Person.java
  #39 = Utf8               Record
  #40 = Utf8               BootstrapMethods
  #41 = MethodHandle       6:#42          // REF_invokeStatic java/lang/runtime/ObjectMethods.bootstrap:(Ljava/lang/invoke/MethodHandles$Lookup;Ljava/lang/String;Ljava/lang/invoke/TypeDescriptor;Ljava/lang/Class;Ljava/lang/String;[Ljava/lang/invoke/MethodHandle;)Ljava/lang/Object;
  #42 = Methodref          #43.#44        // java/lang/runtime/ObjectMethods.bootstrap:(Ljava/lang/invoke/MethodHandles$Lookup;Ljava/lang/String;Ljava/lang/invoke/TypeDescriptor;Ljava/lang/Class;Ljava/lang/String;[Ljava/lang/invoke/MethodHandle;)Ljava/lang/Object;
  #43 = Class              #45            // java/lang/runtime/ObjectMethods
  #44 = NameAndType        #46:#47        // bootstrap:(Ljava/lang/invoke/MethodHandles$Lookup;Ljava/lang/String;Ljava/lang/invoke/TypeDescriptor;Ljava/lang/Class;Ljava/lang/String;[Ljava/lang/invoke/MethodHandle;)Ljava/lang/Object;
  #45 = Utf8               java/lang/runtime/ObjectMethods
  #46 = Utf8               bootstrap
  #47 = Utf8               (Ljava/lang/invoke/MethodHandles$Lookup;Ljava/lang/String;Ljava/lang/invoke/TypeDescriptor;Ljava/lang/Class;Ljava/lang/String;[Ljava/lang/invoke/MethodHandle;)Ljava/lang/Object;
  #48 = String             #49            // firstName;lastName
  #49 = Utf8               firstName;lastName
  #50 = MethodHandle       1:#7           // REF_getField examples/Person.firstName:Ljava/lang/String;
  #51 = MethodHandle       1:#13          // REF_getField examples/Person.lastName:Ljava/lang/String;
  #52 = Utf8               InnerClasses
  #53 = Class              #54            // java/lang/invoke/MethodHandles$Lookup
  #54 = Utf8               java/lang/invoke/MethodHandles$Lookup
  #55 = Class              #56            // java/lang/invoke/MethodHandles
  #56 = Utf8               java/lang/invoke/MethodHandles
  #57 = Utf8               Lookup
{
  private final java.lang.String firstName;
    descriptor: Ljava/lang/String;
    flags: (0x0012) ACC_PRIVATE, ACC_FINAL

  private final java.lang.String lastName;
    descriptor: Ljava/lang/String;
    flags: (0x0012) ACC_PRIVATE, ACC_FINAL

  public examples.Person(java.lang.String, java.lang.String);
    descriptor: (Ljava/lang/String;Ljava/lang/String;)V
    flags: (0x0001) ACC_PUBLIC
    Code:
      stack=2, locals=3, args_size=3
         0: aload_0
         1: invokespecial #1                  // Method java/lang/Record."":()V
         4: aload_0
         5: aload_1
         6: putfield      #7                  // Field firstName:Ljava/lang/String;
         9: aload_0
        10: aload_2
        11: putfield      #13                 // Field lastName:Ljava/lang/String;
        14: return
      LineNumberTable:
        line 3: 0
    MethodParameters:
      Name                           Flags
      firstName
      lastName

  public java.lang.String toString();
    descriptor: ()Ljava/lang/String;
    flags: (0x0001) ACC_PUBLIC
    Code:
      stack=1, locals=1, args_size=1
         0: aload_0
         1: invokedynamic #18,  0             // InvokeDynamic #0:toString:(Lexamples/Person;)Ljava/lang/String;
         6: areturn
      LineNumberTable:
        line 3: 0

  public final int hashCode();
    descriptor: ()I
    flags: (0x0011) ACC_PUBLIC, ACC_FINAL
    Code:
      stack=1, locals=1, args_size=1
         0: aload_0
         1: invokedynamic #22,  0             // InvokeDynamic #0:hashCode:(Lexamples/Person;)I
         6: ireturn
      LineNumberTable:
        line 3: 0

  public final boolean equals(java.lang.Object);
    descriptor: (Ljava/lang/Object;)Z
    flags: (0x0011) ACC_PUBLIC, ACC_FINAL
    Code:
      stack=2, locals=2, args_size=2
         0: aload_0
         1: aload_1
         2: invokedynamic #26,  0             // InvokeDynamic #0:equals:(Lexamples/Person;Ljava/lang/Object;)Z
         7: ireturn
      LineNumberTable:
        line 3: 0

  public java.lang.String firstName();
    descriptor: ()Ljava/lang/String;
    flags: (0x0001) ACC_PUBLIC
    Code:
      stack=1, locals=1, args_size=1
         0: aload_0
         1: getfield      #16                 // Field firstName:Ljava/lang/String;
         4: areturn
      LineNumberTable:
        line 3: 0

  public java.lang.String lastName();
    descriptor: ()Ljava/lang/String;
    flags: (0x0001) ACC_PUBLIC
    Code:
      stack=1, locals=1, args_size=1
         0: aload_0
         1: getfield      #17                 // Field lastName:Ljava/lang/String;
         4: areturn
      LineNumberTable:
        line 3: 0
}
SourceFile: "Person.java"
Record:
  java.lang.String firstName;
    descriptor: Ljava/lang/String;

  java.lang.String lastName;
    descriptor: Ljava/lang/String;

BootstrapMethods:
  0: #41 REF_invokeStatic java/lang/runtime/ObjectMethods.bootstrap:(Ljava/lang/invoke/MethodHandles$Lookup;Ljava/lang/String;Ljava/lang/invoke/TypeDescriptor;Ljava/lang/Class;Ljava/lang/String;[Ljava/lang/invoke/MethodHandle;)Ljava/lang/Object;
    Method arguments:
      #8 examples/Person
      #48 firstName;lastName
      #50 REF_getField examples/Person.firstName:Ljava/lang/String;
      #51 REF_getField examples/Person.lastName:Ljava/lang/String;
InnerClasses:
  public static final #57= #53 of #55;    // Lookup=class java/lang/invoke/MethodHandles$Lookup of class java/lang/invoke/MethodHandles

Interesting… Several things we can notice:

  1. The class is marked final, which means we cannot create a subclass of it.
  2. The class extends java.lang.Record, which is the base class for all records, much like java.lang.Enum is the base class for all enums.
  3. There are two private final fields named after the two components of the record: firstName and lastName.
  4. There is a public constructor that is generated for us: public examples.Person(java.lang.String, java.lang.String). By looking at its body, it’s easy to see that it just assigns the two arguments to the two fields. The constructor is equivalent to:
    public Person(String firstName, String lastName) {
        this.firstName = firstName;
        this.lastName = lastName;
    }
    
  5. There are two getter methods named firstName() and lastName().
  6. Three other methods are generated: toString(), hashCode() and equals(). They all rely on invokedynamic to dynamically invoke the appropriate method containing the implicit implementation. There is a bootstrap method ObjectMethods.bootstrap that takes the component names of the record and its getter methods, and generates the methods. Their behaviors is consistent with what we would expect to have:
    Person john = new Person("John", "Doe");
    System.out.println(john.firstName());         // John
    System.out.println(john.lastName());          // Doe
    System.out.println(john);                     // Person[firstName=John, lastName=Doe]
    
    Person jane = new Person("Jane", "Dae");
    Person johnCopy = new Person("John", "Doe");
    
    System.out.println(john.hashCode());          // 71819599
    System.out.println(jane.hashCode());          // 71407578
    System.out.println(johnCopy.hashCode());      // 71819599
    System.out.println(john.equals(jane));        // false
    System.out.println(john.equals(johnCopy));    // true
    

Adding member declarations in records

We cannot add instance fields to records, which is expected, given that such state should be part of the components. We can however add static fields:

record Person (String firstName, String lastName) {
    static int x;
}

We can define static methods and instance methods that can operate on the state of the object:

record Person (String firstName, String lastName) {
    static int x;

    public static void doX() {
        x++;
    }

    public String getFullName() {
        return firstName + " " + lastName;
    }
}

We can also add constructors, and modify the canonical constructor (the one that takes the two String parameters). If we want to override the canonical constructor, we can omit the parameters and the assignments to the fields:

record Person (String firstName, String lastName) {
    public Person {
        if(firstName == null || lastName == null) {
            throw new IllegalArgumentException("firstName and lastName must not be null");
        // We can also omit assigning fields, the compiler will auto-add them
        }
    }

    public Person(String fullName) {
        this(fullName.split(" ")[0], fullName.split(" ")[1]);
    }
}

Conclusion

Records introduce the capability of properly implementing data classes, without the need to write verbose code. Plain data classes are reduced from several lines of code to a one-liner. There are other language features in progress that work well with records, such as pattern matching. For a much deeper dive into records and background information, see Brian Goetz’s exploratory document on OpenJDK.

From javax.* to jakarta.*: A Simple Proof of Concept

Now that the Jakarta EE project is planning to release its next version (Jakarta EE 9), where the major change is the update of all its APIs to use jakarta.* instead of javax.* in the package names, and hence the issue of breaking binary compatibility, I decided to experiment a little bit with how code that uses javax.* APIs can be dynamically modified (without the need to recompile) so that it runs against the target jakarta.* namespace. It would also be a good opportunity to learn more about Javassist, which I’ll be using to do the renaming at the bytecode level. Note that this post is not intended to propose a solution to this problem of API compatibility. It simply shares an experimentation related to the subject.

Some background

Due to trademark restrictions imposed on the javax.* namespace, Jakarta EE will rename all of its specifications to use jakarta.* in order to move forward with evolving the platform with features as the cloud native Java platform. A major concern here is backward compatibility for existing applications and frameworks using the javax.* APIs in their code. So far, this concern is not explicitly addressed as part of the Jakarta EE specification.

About Javassist

Since this post deals with dynamic manipulation of bytecode, one popular tool for the job is Javassist. It is a very powerful and well-maintained library for editing class files, and is used by many popular projects in the Java ecosystem. Javassists provides both a high-level and a low-level APIs to manipulate bytecode. The low-level API is more flexible and allows editing the raw bytes of the class file, but requires knowledge of the structure of a class file, following the JVM specification. In the example that follows, the low-level API will be used. If you’re not familiar with the structure of Java bytecode, here’s an article that gives an introduction.

Sample code using `javax.*`

The starting point is some dummy code that uses an API under the javax.* namespace (for example, using a Jakarta EE 8 or Java EE 8 API). Here’s a very simple program:

package example.jakartaee;

import javax.json.JsonString;

public class MyJsonString implements JsonString {

    @Override
    public ValueType getValueType() {
        return ValueType.STRING;
    }
    
    @Override
    public String getString() {
        return "test";
    }
    
    @Override
    public CharSequence getChars() {
        return "test";
    }
}

package example.jakartaee;

import javax.json.JsonString;
import javax.json.JsonValue;

public class JakartaEESample {

    static JsonValue jsonValue = new MyJsonString();

    public static void main(String[] args) {
        JsonValue jsonV = new MyJsonString();
        System.out.println(((JsonString)jsonV).getString());
    }
}

So we have some code that use the JSON Processing API in a very dummy (it doesn’t what it does for the moment – all it matters is that it uses some javax API).

Let’s disassemble the code to see what the bytecode looks like, for example for MyJsonString:

javap -v MyJsonString.class
Classfile MyJsonString.class
  Last modified Nov 2, 2019; size 800 bytes
  MD5 checksum a1f98cde65900b434fd184c4980ea911
  Compiled from "MyJsonString.java"
public class example.jakartaee.MyJsonString implements javax.json.JsonString
  minor version: 0
  major version: 55
  flags: (0x0021) ACC_PUBLIC, ACC_SUPER
  this_class: #1                          // example/jakartaee/MyJsonString
  super_class: #3                         // java/lang/Object
  interfaces: 1, fields: 0, methods: 4, attributes: 2
Constant pool:
   #1 = Class              #2             // example/jakartaee/MyJsonString
   #2 = Utf8               example/jakartaee/MyJsonString
   #3 = Class              #4             // java/lang/Object
   #4 = Utf8               java/lang/Object
   #5 = Class              #6             // javax/json/JsonString
   #6 = Utf8               javax/json/JsonString
   #7 = Utf8               
   #8 = Utf8               ()V
   #9 = Utf8               Code
  #10 = Methodref          #3.#11         // java/lang/Object."":()V
  #11 = NameAndType        #7:#8          // "":()V
  #12 = Utf8               LineNumberTable
  #13 = Utf8               LocalVariableTable
  #14 = Utf8               this
  #15 = Utf8               Lexample/jakartaee/MyJsonString;
  #16 = Utf8               getValueType
  #17 = Utf8               ()Ljavax/json/JsonValue$ValueType;
  #18 = Fieldref           #19.#21        // javax/json/JsonValue$ValueType.STRING:Ljavax/json/JsonValue$ValueType;
  #19 = Class              #20            // javax/json/JsonValue$ValueType
  #20 = Utf8               javax/json/JsonValue$ValueType
  #21 = NameAndType        #22:#23        // STRING:Ljavax/json/JsonValue$ValueType;
  #22 = Utf8               STRING
  #23 = Utf8               Ljavax/json/JsonValue$ValueType;
  #24 = Utf8               getString
  #25 = Utf8               ()Ljava/lang/String;
  #26 = String             #27            // test
  #27 = Utf8               test
  #28 = Utf8               getChars
  #29 = Utf8               ()Ljava/lang/CharSequence;
  #30 = Utf8               SourceFile
  #31 = Utf8               MyJsonString.java
  #32 = Utf8               InnerClasses
  #33 = Class              #34            // javax/json/JsonValue
  #34 = Utf8               javax/json/JsonValue
  #35 = Utf8               ValueType
{
  public example.jakartaee.MyJsonString();
    descriptor: ()V
    flags: (0x0001) ACC_PUBLIC
    Code:
      stack=1, locals=1, args_size=1
         0: aload_0
         1: invokespecial #10                 // Method java/lang/Object."":()V
         4: return
      LineNumberTable:
        line 5: 0
      LocalVariableTable:
        Start  Length  Slot  Name   Signature
            0       5     0  this   Lexample/jakartaee/MyJsonString;

  public javax.json.JsonValue$ValueType getValueType();
    descriptor: ()Ljavax/json/JsonValue$ValueType;
    flags: (0x0001) ACC_PUBLIC
    Code:
      stack=1, locals=1, args_size=1
         0: getstatic     #18                 // Field javax/json/JsonValue$ValueType.STRING:Ljavax/json/JsonValue$ValueType;
         3: areturn
      LineNumberTable:
        line 9: 0
      LocalVariableTable:
        Start  Length  Slot  Name   Signature
            0       4     0  this   Lexample/jakartaee/MyJsonString;

  public java.lang.String getString();
    descriptor: ()Ljava/lang/String;
    flags: (0x0001) ACC_PUBLIC
    Code:
      stack=1, locals=1, args_size=1
         0: ldc           #26                 // String test
         2: areturn
      LineNumberTable:
        line 14: 0
      LocalVariableTable:
        Start  Length  Slot  Name   Signature
            0       3     0  this   Lexample/jakartaee/MyJsonString;

  public java.lang.CharSequence getChars();
    descriptor: ()Ljava/lang/CharSequence;
    flags: (0x0001) ACC_PUBLIC
    Code:
      stack=1, locals=1, args_size=1
         0: ldc           #26                 // String test
         2: areturn
      LineNumberTable:
        line 19: 0
      LocalVariableTable:
        Start  Length  Slot  Name   Signature
            0       3     0  this   Lexample/jakartaee/MyJsonString;
}
SourceFile: "MyJsonString.java"
InnerClasses:
  public static final #35= #19 of #33;    // ValueType=class javax/json/JsonValue$ValueType of class javax/json/JsonValue

I’ve shown the full bytecode, but the important thing here is that you can see references to javax.json.JsonString and javax.json.JsonValue.ValueType (a nested enum) in the constant pool, which is the long list of shared constants that are used within method bodies. The constants for these classes are javax/json/JsonString in constant #6, and javax/json/JsonValue$ValueType in constant #20 (this is how the JVM names these types).

There is also another reference to javax.* in the bytecode, specifically in the method public javax.json.JsonValue$ValueType getValueType().

If we want to convert this class to use jakarta.*, we need to do two things:

  1. rename occurrences of javax/json/JsonString and javax/json/JsonValue$ValueType in the constant pool
  2. and change the descriptor of the method getValueType() so that its return type becomes jakarta.json.JsonValue$ValueType.

We can do this using Javassist as follows:

import javassist.*;
import javassist.bytecode.*;


ClassPool classPool = ClassPool.getDefault();

CtClass ctClass = classPool.get("example.jakartaee.MyJsonString");
ClassFile classFile = ctClass.getClassFile();

ConstPool constPool = classFile.getConstPool();
constPool.renameClass("javax/json/JsonString", "jakarta/json/JsonString");
constPool.renameClass("javax/json/JsonValue$ValueType", "jakarta/json/JsonValue$ValueType");

MethodInfo getValueTypeMethod = classFile.getMethod("getValueType");
getValueTypeMethod.setDescriptor("()Ljakarta/json/JsonValue$ValueType;");

// overwrite the class file
classFile.write(new DataOutputStream(new FileOutputStream("MyJsonString.class")));

The ConstPool.renameClass() handles the renaming within the constant pool, while the MethodInfo.setDescriptor() modifies the descriptor of the method so that the return type is renamed. Finally we overwrite the class file (we could also save to a separate file).

After executing the above code, the new MyJsonString.class file has the updated bytecode. You can see that it now has new constants for the jakarta.* class and descriptor names, and the method descriptor is also updated:

...
#36 = Utf8               jakarta/json/JsonString
#37 = Utf8               jakarta/json/JsonValue$ValueType
#38 = Utf8               Ljakarta/json/JsonValue$ValueType;
#39 = Utf8               ()Ljakarta/json/JsonValue$ValueType;

...

public jakarta.json.JsonValue$ValueType getValueType();
  descriptor: ()Ljakarta/json/JsonValue$ValueType;

Let’s look now at the other class file to modify, JakartaEESample.class. In this class, we have a field of type javax.json.JsonValue, and a local variable within the `main` method of the same type. We also do a cast to javax.json.JsonString. Similar to what we did for MyJsonString.class, we can rename these classes in the constant pool using ConstPool.renameClass(), and we still have to modify the descriptor of the field (like we did for the method getValueType() in MyJsonString.class:

CtClass ctClass = classPool.get("example.jakartaee.JakartaEESample");        
ClassFile classFile = ctClass.getClassFile();

ConstPool constPool = classFile.getConstPool();
constPool.renameClass("javax/json/JsonString", "jakarta/json/JsonString");
constPool.renameClass("javax/json/JsonValue", "jakarta/json/JsonValue");

FieldInfo fieldInfo = classFile.getFields().get(0);
fieldInfo.setDescriptor("Ljakarta/json/JsonValue;");

// overwrite the class file
classFile.write(new DataOutputStream(new FileOutputStream("JakartaEESample.class")));

After executing the above code, the bytecode of JakartaEESample.class is updated with new constants for the jakarta.* types (which are in turn referenced in the main method) and with an updated field descriptor:

...
#30 = Class              #47            // jakarta/json/JsonString
#31 = Utf8               javax/json/JsonString
#32 = InterfaceMethodref #30.#33        // jakarta/json/JsonString.getString:()Ljava/lang/String;
...
#47 = Utf8               jakarta/json/JsonString
#48 = Utf8               Ljakarta/json/JsonValue;

static jakarta.json.JsonValue jsonValue;
    descriptor: Ljakarta/json/JsonValue;
    flags: (0x0008) ACC_STATIC

...
public static void main(java.lang.String[]);
    descriptor: ([Ljava/lang/String;)V
    flags: (0x0009) ACC_PUBLIC, ACC_STATIC
    Code:
      stack=2, locals=2, args_size=1
         0: new           #10                 // class example/jakartaee/MyJsonString
         3: dup
         4: invokespecial #12                 // Method example/jakartaee/MyJsonString."":()V
         7: astore_1
         8: getstatic     #24                 // Field java/lang/System.out:Ljava/io/PrintStream;
        11: aload_1
        12: checkcast     #30                 // class jakarta/json/JsonString
        15: invokeinterface #32,  1           // InterfaceMethod jakarta/json/JsonString.getString:()Ljava/lang/String;
        20: invokevirtual #36                 // Method java/io/PrintStream.println:(Ljava/lang/String;)V
        23: return

Verifying that the updated code runs!

Obviously we want to make sure that the updated class files can run without any JVM error. To do this, since we don’t have the real jakarta.* API released, we can create dummy versions of them:

package jakarta.json;

public interface JsonString {

    String getString();
}

package jakarta.json;

public interface JsonValue {

    public enum ValueType {
        ARRAY,
        OBJECT,
        STRING,
        NUMBER,
        TRUE,
        FALSE,
        NULL
    }
}

and we can run provide these dummy interfaces on the classpath when running the class files that were updated by Javassist.

Conclusion

Using powerful libraries like Javassist, dynamic conversion of javax.* referencing code to the new jakarta.* packaging is achievable. You can view the full code here.

Mapping Java Entities for Persistence with Hibernate (Part 4)

This post explores some additional Java ORM mapping features in Hibernate/JPA, focusing on entity association mapping. Make sure to check the earlier posts: part 1, part 2, and part 3. Also as a reminder, Hibernate is a powerful and feature-rich library – these posts serve as an overview of how to use some of its features to map Java domain model classes to relational tables. There are other topics that can be looked up in the official documentation.

Mapping one-to-one associations

One-to-one associations are used to model a single-value relationship from one entity to another. Let’s consider the Publisher entity and the Address embeddable type. We may want to treat Address as an entity rather than an embeddable, especially if another entity (say User) will reference an Address instance. In this case, Address now has its own table, and the association between Publisher and Address would be mapped as a one-to-one association between two independent entities. The mapping in Java code is shown below:

import javax.persistence.CascadeType;
import javax.persistence.OneToOne;

@Entity
public class Publisher {

    @Id
    @GeneratedValue(generator = "idGenerator")  // idGenerator is a GenericGenerator
    protected Long id;

    @Column(nullable = false)
    protected String name;

    @OneToOne(cascade = CascadeType.PERSIST)
    protected Address address;

    ...
}

@Entity
public class Address {

    @Id
    @GeneratedValue(generator = "idGenerator")
    private Long id;

    private String streetName;
    private String city;

    ...
}

The @OneToOne annotation is added to the Address field. In addition, the CascadeType.PERSIST is added to enable cascading of persist operations of Publisher to its associated Address instance. By default, Hibernate generates and uses a foreign key column to map the association. This is the generated DDL by Hibernate’s automatic schema creator:

create table Address (
   id bigint not null,
   city varchar(255),
   streetName varchar(255),
   primary key (id)
)
    
create table Publisher (
   id bigint not null,
   name varchar(255) not null,
   address_id bigint,
   primary key (id)
)

alter table Publisher 
   add constraint FKdqy55988yphy6x9dctrlfkcuk 
   foreign key (address_id) 
   references Address

Here’s an example that creates a Publisher, links it to an Address, and persists it:

try(Session session = sessionFactory.openSession()) {
    Transaction transaction = session.beginTransaction();

    Address address = new Address("Crows Nest", "New South Wales");

    Publisher publisher = new Publisher();
    publisher.setName("Allen & Unwin");
    publisher.setAddress(address);
    session.persist(publisher);
    transaction.commit();
}

We can customize the foreign key column’s properties by applying the @JoinColumn annotation on the associated Address field. For example, we can change the column name and make the association non-optional.

@Entity
public class Publisher {

    ...

    @OneToOne(cascade = CascadeType.PERSIST)
    @JoinColumn(name = "ADDR_ID", nullable = false)
    protected Address address;

    ...
}

Using a join table for one-to-one associations

Instead of using a foreign key column in the table of an associated entity, Hibernate can use an intermediate join table, where each row contains the IDs of the associated instances. This has the advantage of avoiding a nullable additional column in an entity’s table: if a certain Publisher has a null Address reference, then the intermediate table will not have a row for it. In case an association is always non-optional (not null), then it might be better to simply use the default foreign key strategy instead of a join table.

To use a join table, apply the @JoinTable annotation as follows:

import javax.persistence.JoinColumn;
import javax.persistence.JoinTable;

@Entity
public class Publisher {
    ...

    @OneToOne(cascade = CascadeType.PERSIST)
    @JoinTable(name = "PUBLISHER_ADDR",
               joinColumns = @JoinColumn(name = "PUBLISHER_ID"),
               inverseJoinColumns = @JoinColumn(name = "ADDR_ID",
                                                nullable = false,
                                                unique = true))
    protected Address address;

    ...
}

The name of the join table is required. There are two foreign keys in the join table, each referencing the primary tables. The PUBLISHER_ID column acts as the primary key column, and both columns are NOT NULL and unique, as shown in the generated DDL schema:

create table Address (
   id bigint not null,
   city varchar(255),
   streetName varchar(255),
   primary key (id)
) 

create table Publisher (
   id bigint not null,
   name varchar(255) not null,
   primary key (id)
) 

create table PUBLISHER_ADDR (
   ADDR_ID bigint not null,
   PUBLISHER_ID bigint not null,
   primary key (PUBLISHER_ID)
)

alter table PUBLISHER_ADDR 
   add constraint UK_kkvv49xwdf7gdjvesrnr39v1 unique (ADDR_ID)

alter table PUBLISHER_ADDR 
   add constraint FKck3ggfqkhjf9bu3k1w34ofatq 
   foreign key (ADDR_ID) 
   references Address

alter table PUBLISHER_ADDR 
   add constraint FKhsfqdekjgaf3duwnwsd0fof9y 
   foreign key (PUBLISHER_ID) 
   references Publisher

Making the one-to-one association bidirectional

To make the association bidirectional, the other side (non-owning side) uses a mappedBy element on the field:

@Entity
public class Address {

    @OneToOne(mappedBy = "address")
    private Publisher publisher;

    ...
}

Address address = new Address("Crows Nest", "New South Wales");

Publisher publisher = new Publisher();
publisher.setName("Allen & Unwin");
publisher.setAddress(address);

address.setPublisher(publisher);
session.persist(publisher);

One-to-many: Mapping lists with their elements indices

In part 2, we actually mapped a List<Book> in the Author entity:

@Entity
public class Author {
 
    @OneToMany
    @JoinColumn(name = "AUTHOR_ID")
    protected List<Book> books = new ArrayList<>();
 
    ...
}

When persisting Book instances and later fetching them, Hibernate internally uses a PersistentBag to maintain the collection. If you are not going to do in-place change in the list, the order is preserved (the PersistentBag internally uses a List). However, the order of elements is not stored explicitly in the database, and therefore is not guaranteed to be preserved when operating on the list. If the order of elements needs to be stored in the database, then we need to use the @OrderColumn annotation to mark an additional column which will contain the index of the Book instance within the list:

@Entity
public class Author {
 
    @OneToMany
    @JoinColumn(name = "AUTHOR_ID")
    @OrderColumn(name = "BOOK_INDEX", nullable = "false")
    protected List<Book> books = new ArrayList<>();
 
    ...
}

Storing the element order in the table has its drawbacks, mainly because Hibernate will execute several SQL statements. For example, removing an element from the list triggers a DELETE statement, in addition to multiple UPDATE statements to update the column index values of the elements located after the removed one. Furthermore, an application often has a requirement to view items in an order that is different than the default one. For example, we may want to view a list of books written by an author ordered by publishing date.

Using a join table for one-to-many associations

Similar to one-to-one associations, a one-to-many association can use a join table. The advantage is the same: avoiding null values in the foreign key column. The @JoinTable is used instead of @JoinColumn, where the join table and its columns are defined:

@Entity
public class Book {
    ...

    @ManyToOne
    @JoinTable(name = "BOOK_AUTHOR",
               joinColumns = @JoinColumn(name = "BOOK_ID"),
               inverseJoinColumns = @JoinColumn(name = "AUTHOR_ID", nullable = false))
    protected Author author;

    ...
}

@Entity
public class Author {
    ...

    @OneToMany(mappedBy = "author", cascade = CascadeType.PERSIST)
    protected Set<Book> books = new HashSet<>();

    ...
}

The intermediate join table looks similar to the one for the one-to-one example. The difference is that the column AUTHOR_ID is not unique because an author can have more than book:

create table Author (
    id bigint not null,
    birthDay date,
    name varchar(255) not null,
    primary key (id)
)

create table Book (
    id bigint not null,
    title varchar(255) not null,
    primary key (id)
)

create table BOOK_AUTHOR (
    AUTHOR_ID bigint not null,
    BOOK_ID bigint not null,
    primary key (BOOK_ID)
)

alter table BOOK_AUTHOR 
    add constraint FK78oepvclterucki39cv30xw8q 
    foreign key (AUTHOR_ID) 
    references Author

alter table BOOK_AUTHOR 
    add constraint FKqknbd4thdsna3pg8w0pm748u5 
    foreign key (BOOK_ID) 
    references Book

Using a map for one-to-many associations

Another way to map a one-to-many association is using a map. The key would contain the identifier of the target entity, while the value in the map entry would be the reference to the entity instance. Here’s how it would look like for our Book and Author entity classes:

import javax.persistence.MapKey;

@Entity
public class Author {
    ...

    @MapKey(name = "id")
    @OneToMany(mappedBy = "author")
    protected Map<Long, Book> books = new HashMap<>();

    ...
}

@Entity
public class Book {
    ...

    @ManyToOne
    @JoinColumn(name = "AUTHOR_ID", nullable = false)
    protected Author author;

    ...
}

The @MapKey specifies which property in the Book entity is the key of the map. In this case (and the default if name is omitted), the map key is the primary key of the associated Book entity. It can also be some other property that is expected to have a unique constraint, such as the title of the book.

Mapping many-to-many associations

A book may be written by more than one author, so the relationship could be modeled as a many-to-many association. Both Book and Author entity classes would have a collection field. Building on the previous section, we can use a join table to implement this mapping.

import javax.persistence.ManyToMany;

@Entity
public class Book {
    ...

    @ManyToMany(cascade = CascadeType.PERSIST)
    @JoinTable(name = "BOOK_AUTHOR",
               joinColumns = @JoinColumn(name = "BOOK_ID"),
               inverseJoinColumns = @JoinColumn(name = "AUTHOR_ID"))
    protected Set<Author> authors = new HashSet<>();

    ...
}

We can also make the association bidirectional by mapping a books field in the Author class, with a mappedBy element:

@Entity
public class Author {
    ...

    @ManyToMany(mappedBy = "authors")
    protected Set<Book> books = new HashSet<>();

    ...
}

In the join table, the primary key is a composite of both columns BOOK_ID and AUTHOR_ID in order to satisfy the multiplicity of the many-to-many relationship: we can have the same author linked to many books, and vice versa. Both columns are also foreign key columns referencing the main entity tables:

create table Author (
    id bigint not null,
    birthDay date,
    name varchar(255) not null,
    primary key (id)
)

create table Book (
    id bigint not null,
    title varchar(255) not null,
    primary key (id)
)

create table BOOK_AUTHOR (
    BOOK_ID bigint not null,
    AUTHOR_ID bigint not null,
    primary key (BOOK_ID, AUTHOR_ID)
)

alter table BOOK_AUTHOR 
    add constraint FK78oepvclterucki39cv30xw8q 
    foreign key (AUTHOR_ID) 
    references Author

alter table BOOK_AUTHOR 
    add constraint FKqknbd4thdsna3pg8w0pm748u5 
    foreign key (BOOK_ID) 
    references Book

Using an intermediate entity class

The join table can be explicitly modeled by an entity class, which may be useful if we want to include additional data on the link between the two entities, for example a boolean to indicate whether an author was the first author or a contributor to a certain book. Using such an approach is therefore more flexible than using the @JoinTable annotation.

Here’s an example of what an intermediate entity can look like:

@Entity
@Immutable
public class BookAuthor {

    @Embeddable
    public static class Id implements Serializable {

        @Column(name = "BOOK_ID")
        private Long bookId;

        @Column(name = "AUTHOR_ID")
        private Long authorId;

        @Override
        public int hashCode() {
            return bookId.hashCode() + authorId.hashCode();
        }

        @Override
        public boolean equals(Object obj) {
            if (obj != null && obj instanceof Id) {
                Id other = (Id) obj;
                return this.authorId.equals(other.authorId) && this.bookId.equals(other.bookId);
            }
            return false;
        }

    }
    
    @EmbeddedId
    private Id id = new Id();
    
    @Column(name = "IS_CONTRIB")
    private boolean isContributor;
    
    @ManyToOne
    @JoinColumn(name = "BOOK_ID", insertable = false, updatable = false)
    private Book book;
    
    @ManyToOne
    @JoinColumn(name = "AUTHOR_ID", insertable = false, updatable = false)
    private Author author;
    
    public BookAuthor() {}

    public BookAuthor(Book book, Author author, boolean isContributor) {
        this.book = book;
        this.author = author;
        this.isContributor = isContributor;
        
        this.id.bookId = book.getId();
        this.id.authorId = author.getId();
        
        book.getAuthors().add(this);
        author.getBooks().add(this);
    }
}

This is an entity class as marked by @Entity. It is also marked immutable because instances of this class will not be modified. As seen in part 1, this tells Hibernate not to do dirty checking when synchronizing the instances with the database, which improves performance. The identifier property of this entity is a composite key defined by an Embeddable class. Finally, there are two @ManyToOne associations to the Book and Author entities. The join columns (foreign key columns in the intermediate table) are defined with insertable = false, updatable = false, otherwise Hibernate will throw an error because these columns are already mapped within the Embeddable ID class.

The intermediate table is similar to the one using @JoinTable, but with an additional column as mapped in the BookAuthor entity class:

create table BookAuthor (
    AUTHOR_ID bigint not null,
    BOOK_ID bigint not null,
    IS_CONTRIB boolean,
    primary key (AUTHOR_ID, BOOK_ID)
)

In the Book and Author classes, the association to BookAuthor can be mapped each with a @OneToMany relationship:

@Entity
public class Book {
    ...

    @OneToMany(mappedBy = "book")
    protected Set<BookAuthor> authors = new HashSet<>();

    ...
}

@Entity
public class Author {
    ...

    @OneToMany(mappedBy = "author")
    protected Set<BookAuthor> books = new HashSet<>();

    ...
}

Mapping Java Entities for Persistence with Hibernate (Part 3)

In part 2, we went over mapping collections such as a simple set of strings, as well as basic associations between entities. The Book entity were enriched with many-to-one associations to Author and Publisher. In this part, we’ll explore how to map subclasses (inheritance) to tables using the various available strategies.

Inheritance is a common aspect of object-oriented languages like Java, but has no support in standard relational databases or SQL. So Hibernate (and JPA) offers several ways to bridge this in its ORM implementation. Going back to our sample domain model, let’s say that the class Book inherits from an abstract class Publication, along with another subclass Magazine:

public abstract class Publication {

    protected Long id;
    protected String title;
    protected Publisher publisher;
    protected Date publishingDate;

    ...
}

public class Book extends Publication {

    protected int volumes;
    protected Set<String> contentTags = new HashSet<>();
    protected Author author;

    ...
}

public class Magazine extends Publication {

    protected int issueNumber;
    protected Schedule schedule;

    ...
}

public enum Schedule {
    WEEKLY, MONTHLY, YEARLY
}

Using @MappedSuperclass

The first strategy to map this inheritance is to have two tables each for the subclasses Book and Magazine, where each table contains columns for attributes in the concrete class as well as those inherited from the parent class Publication. A simple way to do this is to add @MappedSuperclass to Publication and map the subclasses using @Entity just as before:

import javax.persistence.MappedSuperclass;

@MappedSuperclass
public abstract class Publication {

    @Id
    @GeneratedValue(generator = "idGenerator")
    ... // declare idGenerator here or in a shared package-info.java
    protected Long id;

    @Column(nullable = false)
    protected String title;

    @ManyToOne
    @JoinColumn(name = "PUBLISHER_ID", nullable = false)
    protected Publisher publisher;

    @Temporal(TemporalType.DATE)
    protected Date publishingDate;

    ...
}

@Entity
public class Book extends Publication {

    protected int volumes;

    @ElementCollection
    @CollectionTable(name = "CONTENT_TAG",
                 joinColumns = @JoinColumn(name = "BOOK_ID"))
    @Column(name = "TAG", nullable = false)
    protected Set<String> contentTags = new HashSet<>();

    @ManyToOne
    @JoinColumn(name = "AUTHOR_ID", nullable = false)
    protected Author author;

    ...
}

@Entity
public class Magazine extends Publication {

    protected int issueNumber;

    @Enumerated(EnumType.STRING)   // store the enum value as string
    protected Schedule schedule;

    ...
}

This results in two tables (ignoring those for Author and Publisher):

create table Book (
    id bigint not null,
    publishingDate date,
    title varchar(255) not null,
    volumes integer not null,
    PUBLISHER_ID bigint,
    AUTHOR_ID bigint not null,
    primary key (id)
)

create table Magazine (
    id bigint not null,
    publishingDate date,
    title varchar(255) not null,
    issueNumber integer not null,
    schedule varchar(255),
    PUBLISHER_ID bigint not null,
    primary key (id)
)

The main problem with this mapping strategy is that it doesn’t easily support polymorphism in Java code. For example, we cannot execute a query on the superclass Publication so that it covers both tables of its subclasses. If the application will not really need such queries and will explicitly query the specific subclasses, then this approach may be suitable.

Table per concrete class mapping using union for polymorphic queries

If we instead map the parent class as an entity and specify InheritanceType.TABLE_PER_CLASS, then we’d end up with the same schema as before, but Hibernate would use UNION to run polymorphic queries:

import javax.persistence.Inheritance;
import javax.persistence.InheritanceType;

@Entity
@Inheritance(strategy = InheritanceType.TABLE_PER_CLASS)
public abstract class Publication {

    @Id
    @GeneratedValue(generator = "idGenerator")
    ... // declare idGenerator here or in a shared package-info.java
    protected Long id;

    @Column(nullable = false)
    protected String title;

    @ManyToOne
    @JoinColumn(name = "PUBLISHER_ID", nullable = false)
    protected Publisher publisher;

    @Temporal(TemporalType.DATE)
    protected Date publishingDate;

    ...
}

Again we have only two tables for the concrete classes Book and Magazine as shown below. Note that if the parent class was not abstract, we would have a third table (remember that this a table-per-concrete-class strategy).

create table Book (
    id bigint not null,
    publishingDate date,
    title varchar(255) not null,
    PUBLISHER_ID bigint not null,
    volumes integer not null,
    AUTHOR_ID bigint not null,
    primary key (id)
)

create table Magazine (
    id bigint not null,
    publishingDate date,
    title varchar(255) not null,
    PUBLISHER_ID bigint not null,
    issueNumber integer not null,
    schedule varchar(255),
    primary key (id)
)

To demonstrate how a polymorphic query is executed by Hibernate, let’s query a publication by its title, knowing that it’s a book:

Query<Publication> query = session.createQuery("from Publication where title = :title", Publication.class);
query.setParameter("title", "The Lord of the Rings");
Book book = (Book) query.getSingleResult();
assertEquals("The Lord of the Rings", book.getTitle());
assertEquals("1954-07-29", book.getPublishingDate());
assertEquals("J. R. R. Tolkien", book.getAuthor().getName());
assertEquals("Allen & Unwin", book.getPublisher().getName());

If we turn on SQL logging, we see that it used the following query:

select publicatio0_.id as id1_4_, publicatio0_.PUBLISHER_ID as PUBLISHE4_4_,
       publicatio0_.publishingDate as publishi2_4_,
       publicatio0_.title as title3_4_, publicatio0_.AUTHOR_ID as AUTHOR_I2_1_,
       publicatio0_.volumes as volumes1_1_, publicatio0_.issueNumber as issueNum1_3_,
       publicatio0_.schedule as schedule2_3_, publicatio0_.clazz_ as clazz_
from ( select id, publishingDate, title, PUBLISHER_ID, volumes, AUTHOR_ID,
       null as issueNumber, null as schedule, 1 as clazz_
       from Book
       union
       all select id, publishingDate, title, PUBLISHER_ID, null as volumes,
           null as AUTHOR_ID, issueNumber, schedule, 2 as clazz_
       from Magazine ) publicatio0_
where publicatio0_.title=?

Single table for class hierarchy

Another way to map an inheritance hierarchy is to use only one table for all classes. This table would include columns for all attributes of all classes. An additional column, called the discriminator column, tells Hibernate which type each row corresponds to. The advantage is performance since no joins or unions are needed and polymorphism is therefore fast at the level of the DB. The major disadvantage is that subclasses cannot have fields that are nullable=false, since the columns of these fields are also shared by other subclasses that do not have these fields. This leaves the responsibility of enforcing the data integrity to the programmer, using data validation logic in the business code.

import javax.persistence.DiscriminatorColumn;

@Entity
@Inheritance(strategy = InheritanceType.SINGLE_TABLE)
@DiscriminatorColumn(name = "PUBLICATION_TYPE")
public abstract class Publication {

    @Id
    @GeneratedValue(generator = "idGenerator")
    ... // declare idGenerator here or in a shared package-info.java
    protected Long id;

    @Column(nullable = false)
    protected String title;

    @ManyToOne
    @JoinColumn(name = "PUBLISHER_ID", nullable = false)
    protected Publisher publisher;

    @Temporal(TemporalType.DATE)
    protected Date publishingDate;

    ...
}

@Entity
public class Book extends Publication {

    @ManyToOne
    @JoinColumn(name = "AUTHOR_ID")  // must be nullable!
    protected Author author;

    ...
}

@Entity
public class Magazine extends Publication {
    ...
}

The resulting schema is a single table for all classes in the hierarchy:

create table Publication (
    PUBLICATION_TYPE varchar(31) not null,
    id bigint not null,
    publishingDate date,
    title varchar(255) not null,
    volumes integer,
    issueNumber integer,
    schedule varchar(255),
    PUBLISHER_ID bigint not null,
    AUTHOR_ID bigint,
    primary key (id)
)

Queries against the parent type are straightforward – Hibernate queries the single table and uses the specified criteria as the WHERE clause. If the application queries against a specific subclass, Hibernate further uses the discriminator column PUBLICATION_TYPE to filter only the rows for that particular subclass. For example, the JPA query from Book where title = :title would generate the following SQL:

select book0_.id as id2_2_, book0_.PUBLISHER_ID as PUBLISHE8_2_,
       book0_.publishingDate as publishi3_2_, book0_.title as title4_2_,
       book0_.AUTHOR_ID as AUTHOR_I9_2_, book0_.volumes as volumes5_2_
from Publication book0_
where
    book0_.PUBLICATION_TYPE='Book'
    and book0_.title=?

Joined tables

The fourth mapping strategy is to map each subclass to a table containing columns mapped only to the properties declared in the subclass. The tables are joined via foreign key constraints to the table of their superclass, which contains columns for the inherited properties. Polymorphic queries would use JOIN in the SQL statements using the foreign key columns.

@Entity
@Inheritance(strategy = InheritanceType.JOINED)
public abstract class Publication {

    @Id
    @GeneratedValue(generator = "idGenerator")
    ... // declare idGenerator here or in a shared package-info.java
    protected Long id;

    @Column(nullable = false)
    protected String title;

    @ManyToOne
    @JoinColumn(name = "PUBLISHER_ID", nullable = false)
    protected Publisher publisher;

    @Temporal(TemporalType.DATE)
    protected Date publishingDate;

    ...
}

@Entity
public class Book extends Publication {

    protected int volumes;

    @ElementCollection
    @CollectionTable(name = "CONTENT_TAG",
                 joinColumns = @JoinColumn(name = "BOOK_ID"))
    @Column(name = "TAG", nullable = false)
    protected Set<String> contentTags = new HashSet<>();

    @ManyToOne
    @JoinColumn(name = "AUTHOR_ID", nullable = false)
    protected Author author;

    ...
}

@Entity
public class Magazine extends Publication {

    protected int issueNumber;

    @Enumerated(EnumType.STRING)
    protected Schedule schedule;

    ...
}

The resulting schema is two tables for the subclasses Book and Magazine, joined with a table for the parent class Publication:

create table Book (
    volumes integer not null,
    id bigint not null,
    AUTHOR_ID bigint not null,
    primary key (id)
)

create table Magazine (
    issueNumber integer not null,
    schedule varchar(255),
    id bigint not null,
    primary key (id)
)

create table Publication (
    id bigint not null,
    publishingDate date,
    title varchar(255) not null,
    PUBLISHER_ID bigint not null,
    primary key (id)
)

alter table Book 
    add constraint FKh7kfm44rlyes4hoxg70sw2v7k 
    foreign key (id) 
    references Publication

alter table Magazine 
    add constraint FKg27disaxrv1fevl8118yt1ejr 
    foreign key (id) 
    references Publication

Queries would use JOIN in order to retrieve all columns for an entity (both those for the subclass fields and those inherited). As an example, the query from Publication where title = :title would result in the following SQL:

select publicatio0_.id as id1_4_, publicatio0_.PUBLISHER_ID as PUBLISHE4_4_,
       publicatio0_.publishingDate as publishi2_4_, publicatio0_.title as title3_4_,
       publicatio0_1_.AUTHOR_ID as AUTHOR_I3_1_, publicatio0_1_.volumes as volumes1_1_,
       publicatio0_2_.issueNumber as issueNum1_3_, publicatio0_2_.schedule as schedule2_3_,
       case
           when publicatio0_1_.id is not null then 1
           when publicatio0_2_.id is not null then 2
           when publicatio0_.id is not null then 0
       end as clazz_
from Publication publicatio0_
left outer join
    Book publicatio0_1_
    on publicatio0_.id=publicatio0_1_.id
left outer join
    Magazine publicatio0_2_
    on publicatio0_.id=publicatio0_2_.id
where publicatio0_.title=?

Hibernate used a case clause to determine the correct class type based on the presence of the id column.

Stay tuned for part 4…

Mapping Java Entities for Persistence in Hibernate (Part 2)

In the previous post on mapping Java domain model classes using Hibernate and JPA, we visited some basic entity mapping topics, such as mapping identifiers, columns and embedded types. In this part, we’ll review how to map collections in entites as well as basic entity associations.

Persisting collections

JDK collections are heavily used in any complex enterprise application because they are naturally required to model the business domain. For example, in our Book entity, we may want to define a set of tags that describe the genre of the book. A Set<String> would be suitable because we don’t care about the order of these tags and there shouldn’t be duplicates:

import javax.persistence.CollectionTable;
import javax.persistence.ElementCollection;
import javax.persistence.JoinColumn;

@Entity
public class Book {

    @ElementCollection
    @CollectionTable(name = "CONTENT_TAG",
	             joinColumns = @JoinColumn(name = "BOOK_ID"))
    @Column(name = "TAG", nullable = false)
    protected Set<String> contentTags = new HashSet<>();

    ...
}

It is important to remember to initialize the set within the declaration statement to avoid any null references. The declaration type also has to be the interface Set, not the implementation HashSet. The @ElementCollection is required to map this collection. The two other annotations specify metadata about the table that will store the collection. @CollectionTable specifies a name for the table (CONTENT_TAG) that will store the tags, along with a foreign key column BOOK_ID via the @JoinColumn in the collection table. Finally, the @Column defines the name of the column storing the actual tag strings, and also marks it as non-nullable.

If we enable logging of the schema creation, Hibernate will issue the following DDL when creating the collection table:

create table CONTENT_TAG (
   BOOK_ID bigint not null,
   TAG varchar(255) not null,
   primary key (BOOK_ID, TAG)
)

alter table CONTENT_TAG 
   add constraint FKitxsi0kpxsoexvnjlnlxmgci7 
   foreign key (BOOK_ID) 
   references Book

In other words, a new table CONTENT_TAG is created which references the Book table via a foreign key BOOK_ID and contains a column TAG to store an element in the collection.

There are other types of collections that an entity may need to have such as a list or a map, but the way these are mapped is similar to the above (consult the documentation of Hibernate for more details). The differences are in how to specify the ordering in the case of ordered collections like a list, or how to map the key column in the case of a map.

Basic entity associations

So far we mainly have one entity that is mapped, the Book entity. Applications usually have many more entities, where some are associated with others. For example, every book should have an author and a publisher, and these warrant their own entities in our model: an Author entity and a Publisher entity. Let’s define them:

@Entity
public class Author {

    @Id
    @GeneratedValue(generator = "idGenerator")
    @GenericGenerator(name = "idGenerator", strategy = "enhanced-sequence", parameters = {
             @Parameter(name = SequenceStyleGenerator.SEQUENCE_PARAM, value = "BookSequence"),
             @Parameter(name = SequenceStyleGenerator.INITIAL_PARAM, value = "100") })
    protected Long id;

    @Column(nullable = false)
    protected String name;

    @Temporal(TemporalType.DATE)
    protected Date birthDay;

    @Column(length = 30, nullable = false)
    protected String country;

    ...
}

@Entity
public class Publisher {

    @Id
    @GeneratedValue(generator = "idGenerator")
    @GenericGenerator(name = "idGenerator", strategy = "enhanced-sequence", parameters = {
              @Parameter(name = SequenceStyleGenerator.SEQUENCE_PARAM, value = "BookSequence"),
              @Parameter(name = SequenceStyleGenerator.INITIAL_PARAM, value = "100") })
    protected Long id;

    @Column(nullable = false)
    protected String name;

    protected Address address;
    ...
}

We used the enhanced-sequence generator to generate the identifier values. The Author also has a temporal field containing the date of birth, and the Publisher embeds an Address component. See part 1 for a quick review of these features.

Mapping a many-to-one association

An Author should be associated with a Book. An author can have many books written by him or her, while every book must have an author. On the Book side, there is a many-to-one association to Author. Let’s focus on this side first, which is the starting point in such associations. We introduce a field author in the Book class and map it with a @ManyToOne annotation. Similarly, a field publisher is defined to represent the association to a Publisher:

import javax.persistence.ManyToOne;

@Entity
public class Book {
    ...

    @ManyToOne
    @JoinColumn(name = "AUTHOR_ID", nullable = false)
    protected Author author;

    @ManyToOne(optional = false) // equivalent to nullable = false
    @JoinColumn(name = "PUBLISHER_ID")
    protected Publisher publisher;

    ... // getters and setters
}

The resulting schema is shown in the following DDL:

create table Book (
    id bigint not null,
    publishingDate date,
    title varchar(255) not null,
    volumes integer not null,
    AUTHOR_ID bigint not null,
    PUBLISHER_ID bigint not null,
    primary key (id)
)

alter table Book 
   add constraint FKe3rppuv3qa0j4ewpn52qfljn6 
   foreign key (AUTHOR_ID) 
   references Author

alter table Book 
   add constraint FKrb2njmkvio5mhe42empuaiphu 
   foreign key (PUBLISHER_ID) 
   references Publisher

So now the Book table has two foreign key columns AUTHOR_ID and PUBLISHER_ID as specified in the @JoinColumn annotations. They are also non-nullable, making the author and publisher fields required in a Book object before being persisted in a session.

Bidirectional association with one-to-many

Each of these many-to-one associations (from Book to Author and from Book to Publisher) is so far a unidirectional association. The other side does not map an association to Book, because it is optional to do so. We can now get the author of any loaded Book instance by accessing its author property. If we want to get all books written by an author, we can write a JPQL query and execute it. However, if this specific query is commonly needed, it may be a good idea to map the other side, for example by having a List<Book> in the Author class annotated with @OneToMany. This way Hibernate automatically executes select * from Book where AUTHOR_ID = ? whenever we call author.getBooks():

import javax.persistence.OneToMany;

@Entity
public class Author {
    ...

    @OneToMany(mappedBy = "author")
    protected List<Book> books = new ArrayList<>();

    ... // getters and setters

    public void addBook(Book book) {
        this.books.add(book);
        book.setAuthor(this);
    }
}

The mappedBy element in @OneToMany specifies which field is the owner of this bidirectional association. It is the author field in the Book class. This fits naturally as an author “owns” their books. In terms of the DB schema, nothing changes: Hibernate relies on the foreign key column mapped earlier on the author to construct the SQL that selects all books of a given author.

Two things are important to remember. First, whenever we load an Author object from the database using Hibernate, its books are not immediately fetched. Only when we access it (e.g. using a getter) will it send the SQL to fetch and load all its Book instances. This is called lazy fetching and is the default behavior for one-to-many relationships. It can switched to eager fetching if needed. Note that for many-to-one association (@ManyToOne), the default is eager fetching.

Second, managing a bidirectional entity association requires that both sides be consistent. Whenever we set the author of a book using setAuthor() we should also add the book to the author’s list. A recommendation is to group this in a helper method, as shown above in addBook().

Unidirectional one-to-many association

Although it seems less likely to be used, we can also have the one-to-many association on one side. In this case, the mappedBy element used above would not work because Book no longer has an association to Author. Instead we use a @JoinColumn to tell Hibernate which column to use in order to fetch Book instances given an author id:

@Entity
public class Author {

    @OneToMany
    @JoinColumn(name = "AUTHOR_ID")
    protected List<Book> books = new ArrayList<>();

    ...
}

Hibernate would then use that column as a foreign key for retrieving all books belonging to an author:

create table Book (
    id bigint not null,
    publishingDate date,
    title varchar(255) not null,
    volumes integer not null,
    PUBLISHER_ID bigint not null,
    AUTHOR_ID bigint,
    primary key (id)
)

create table Author (
    id bigint not null,
    birthDay date,
    country varchar(30) not null,
    name varchar(255) not null,
    primary key (id)
)

alter table Book 
    add constraint FKe3rppuv3qa0j4ewpn52qfljn6 
    foreign key (AUTHOR_ID) 
    references Author

More on collection and association mappings

This post illustrated simple examples of mapping collections and/or associations between entities. Of course there many JDK collections supported by Hibernate, and other examples of entity associations which you can find in the Hibernate documentation.

Stay tuned for part 3…

Mapping Entities for Persistence in Hibernate (Part 1)

In this series of posts, we’ll explore how the domain classes in a Java application can be mapped to relational tables for persistence in a database using Hibernate. The goal is to summarize the techniques and best practices for correctly implementing the domain model of applications that need to load and store objects in an SQL database.

To make examples easy to follow, our domain consists of simple entities representing books along with their authors, namely: a Book class, an Author class, and Publisher for representing the publisher of books. In this first part, the focus will be on basic mapping for the Book entity.

Declaring entity mappings

Before going through the examples, let’s review how mappings from object-oriented domain classes to relational tables are added to an application. There are two ways: (1) using annotations in Java code, and (2) using XML files using either JPA standard format or Hibernate hbm.xml files. In all the following examples, we will use annotations defined in the JPA standard and Hibernate specific annotations for features beyond what the JPA standard includes. Also note that the target Hibernate version is 5.4 (which also supports JDK 11), but most of the details apply to either Hibernate 4.x and 5.x releases.

Basic entity mapping

The starting point for mapping a class is the JPA annotation @javax.persistence.Entity. It is required for enabling persistence of the class. In addition an identifier for the entity must be specified, mapping it to the primary key column using the @javax.persistence.Id JPA annotation. The most basic mapping is shown below.

import javax.persistence.Entity;
import javax.persistence.Id;

@Entity
public class Book {

    @Id
    private Long id;

    ...
}

How does the identifier property (the id field) get its value? In this case, Hibernate expects you to set the value explicitly. In other words, if you try to persist a Book instance by creating it with the default constructor and calling session.save(), an exception will occur because the value of the identifier (and therefore the primary key column) is null (notice that id is of type Long, not the primitive long, which would have worked because it defaults to 0):

session.save(new Book());  // throws IdentifierGenerationException: ids for 
                           // this class must be manually assigned before
                           // calling save()

In this case, the id value must be assigned either via a constructor or a setter method. Normally, however, you want to let Hibernate automatically generate the identifier value, for example using an auto-incremented column in the target table. This can be done using the @GeneratedValue annotation:

import javax.persistence.GeneratedValue;

@Entity
public class Book {

    @Id
    @GeneratedValue
    protected Long id;

    ...
}

The next question is: how exactly does Hibernate generate the id value? The answer is it depends on the database vendor, or specifically the org.hibernate.dialect.Dialect subclass for the target database. Most of the time, it turns out to use either a sequence or an identity column as the strategy to generate the value. To be consistent from one database to another, it is best to specify the generation strategy explicitly. Hibernate provides several strategies. For example, enhanced-sequence is a generator strategy that uses a sequence to get the next value, and if the database does not support sequences it falls back to a table simulating a sequence. Standardized generator strategies are defined in the enum javax.persistence.GenerationType. For example, to use the JPA standard sequence-based generator, we set the strategy to GenerationType.SEQUENCE:

@Entity
public class Book {

    @Id
    @GeneratedValue(strategy = GenerationType.SEQUENCE)
    protected Long id;

    ...
}

To use the more powerful Hibernate generation strategies and to gain control over generation parameters, we can leverage the Hibernate @org.hibernate.annotations.GenericGenerator annotation:

@Entity
public class Book {

    @Id
    @GeneratedValue(generator = "idGenerator")
    @org.hibernate.annotations.GenericGenerator(name = "idGenerator",
             strategy = "enhanced-sequence",
             parameters = {
                 @org.hibernate.annotations.Parameter(name = "initial_value",
                                                      value = "100")
             })
    protected Long id;

    ...
}

This causes Hibernate to use the sequence (or a table simulating it) to get the next id value, starting at value 100, i.e. the first entity instance that gets persisted would have id value 100, the next would have 101, etc.

More on basic entity mapping

Excluding columns from persistence

By default, all fields in the annotated class get included in the persisted rows, along with the primary column mapped by the id field (actually to be specific, all fields whose types are either basic built-in Java types or embeddable types, or serializable, or fields that are mapped using associations; other fields will cause an error). Let’s say Book has a title field, then it will be automatically mapped by Hibernate:

@Entity
public class Book {

    @Id
    ...
    protected Long id;

    protected String title; // No need for mapping annotation

    ... // getter(s) and setter(s)
}

Suppose we wanted to exclude title from being persisted, we can annotate by @javax.persistence.Transient or use the transient modifier.

import javax.persistence.Transient;

@Entity
public class Book {

    ...

    @Transient
    protected String title;

    ... // getter(s) and setter(s)
}

Controlling the column mapping

Now let’s suppose that we do want the title field to be persisted, but we want to control its mapped column, for example to make it NOT NULL, or maybe to change the name of the column. To do this we use the @Column annotation:

import javax.persistence.Column;

@Entity
public class Book {

    @Id
    ...
    protected Long id;

    // Note that TITLE is already the default column name
    @Column(name = "TITLE", nullable = false)
    protected String title;

    ...
}

Now Hibernate would throw an exception if a Book is persisted while having a null title. Hibernate also adds a NOT NULL constraint when generating the schema using its DDL generation tool (as configured by the setting hibernate.hbm2ddl.auto).

Table naming

Another thing we might want to control is the name of the table mapped by the class. This can be done using @Table being placed on the class:

import javax.persistence.Table; 

@Entity
@Table(name = "BOOK")
public class Book {
   ...
}

Entity naming

The @Entity annotation also has a name element, but this controls the entity’s name, not the table name. The entity name is used queries executed using Hibernate’s supported query syntax. For example, to select a book given its title, a query would be:

Query<Book> query = session.createQuery("from Book where title = :title",
                                        Book.class);
query.setParameter("title", "some title");
Book book = query.getSingleResult();

The entity name is by default the unqualified name of the class. If we have, for whatever reason, another Book entity class in an another package, then we would need to change the entity name to avoid any naming conflict in the query.

Mapping an immutable class

Some of the entity classes may be designed to be immutable. In this case, the annotation @org.hibernate.annotations.Immutable can be used to tell Hibernate that it should ignore any updates to the entity. It helps improve performance by excluding the class from dirty checking during persistence operations.

@Entity
@org.hibernate.annotations.Immutable
public class Book {
   ...
}

Mapping date/time fields

Fields of type java.util.Date and java.util.Calendar have a special mapping requirement in JPA. Such a field needs to be annotated with @javax.persistence.Temporal specifying whether the temporal type is a date, a time or a timestamp. Note however that Hibernate works without @Temporal by defaulting to a temporal type of TIMESTAMP.

Let’s say we want to add a new field containing the publishing date for a book. We probably want the date to contain only the year, the month and the day, without any time component. This can be done using by setting the @Temporal annotation as follows:

import javax.persistence.Temporal;
import javax.persistence.TemporalType;

@Entity
public class Book {
    ...

    @Temporal(TemporalType.DATE)
    protected Date publishingDate;

    ...

This should map it to a SQL DATE type. Note that the default value of publishingDate is null. The user has to set it on the Book instance before saving it. If the field was instead creationTime representing the timestamp at which the object was inserted into the table, then we might want to have it auto-generated for us before insertion. To accomplish this, we can use the @org.hibernate.annotations.CreationTimestamp, as shown below.

@Temporal(TemporalType.TIMESTAMP)  // default in Hibernate
@CreationTimestamp
protected Date creationTime;

For an auto-generated timestamp upon an update, a similar @org.hibernate.annotations.UpdateTimestamp can be used.

Mapping embedded types

Some classes have semantics that make them be part of or embedded in an entity instance, without them having an identity that makes them independent. For example, let’s say we want to have a class BookMetadata that contains some information about a book, e.g. a string containing the main topic. A Book would have a reference to a BookMetadata, but that instance does not have a separate identity or lifecycle. It is completely part of the Book object in the sense of composition in object-oriented terms. BookMetadata has essentially the same relationship as a String or a Date. We map it using an @Embeddable annotation to mark it as such:

import javax.persistence.Embeddable;

@Embeddable
public class BookMetadata {

    private String mainTopic;
    private boolean coauthored;

    ... // constructors, getters, setters
}

@Entity
public class Book {
    ...

    protected BookMetadata bookMetadata;

    ...
}

The important thing to realize on the mapped table side is that we now have one table called BOOK containing columns mapped by the Book class, plus the columns mapped by BookMetadata. Here is the generated schema:

create table BOOK (
    id bigint not null,
    coauthored boolean not null,
    mainTopic varchar(255),
    publishingDate timestamp,
    title varchar(255) not null,
    primary key (id)
)

We may want to change the name of a column in the embeddable field. To do this, we need to override the mapping of the fields of BookMetadata using the annotation @AttributeOverride applied on the owning entity as shown below:

import javax.persistence.AttributeOverride;

@Entity
public class Book {

    ...

    @AttributeOverride(name = "mainTopic",
               column = @Column(name = "TOPIC", length = 60, nullable = false))
    @AttributeOverride(name = "coauthored",
               column = @Column(name = "CO_AUTHORED"))
    protected BookMetadata bookMetadata;

    ...
}

Note that we also changed the length of VARCHAR from 255 to 60 within the overriden @Column mapping for mainTopic, and made it not nullable. The resulting schema is then:

create table BOOK (
    id bigint not null,
    CO_AUTHORED boolean,
    TOPIC varchar(60) not null,
    publishingDate timestamp,
    title varchar(255) not null,
    primary key (id)
)

Stay tuned for more in the upcoming part 2…

Remote Debugging Java Applications With JDWP

Most of Java developers have had the need to debug their applications, usually to find and fix an issue there. In many cases, the application to debug (known as the “debuggee”) is launched from within the IDE used by the developer, while the debugger is also integrated in the IDE, allowing easy inspection of the program state in a step-by-step manner. Sometimes, however, the debuggee JVM is launched from a separate command line, or by executing it on a separate host. In such scenarios, debugging necessitates launching the JVM with some options suitable for debugging, while your IDE debugger would have to connect to it. This is where JDWP (Java Debug Wire Protocol) comes into play.

What is JDWP?

In order to debug remotely executed JVMs (where the debuggee is separately launched locally or on another machine), the Java platform defines a protocol for communication between the JVM and the debugger. JDWP dictates the format of the commands sent by the debugger (e.g. to evaluate a local variable), and replies by the JVM. The exact way of transporting the packets is not specified and is up to the implementation to define transport mechanisms. What JDWP specifies is the format and layout of packets containing commands and those containing replies. Therefore it is conceptually very simple.

JDWP is only one part of the debugging infrastructure in the Java platform. The endpoints (debugger and debuggee) communicating over JDWP implement other specifications to provide the actual debugging functionality. The JVM implements the JVM Tool Interface (JVMTI) to provide debugging functionality for it, for example, to control executions using breakpoints or inspecting the current object. JVMTI is the low-level layer implemented natively in the JVM. The debugger implements another interface called the Java Debug Inteface (JDI) that provides a high-level way to carry debugging requests from the debugger process. JDI is a pure Java interface. Together, JVMTI, JDWP and JDI form the main layers of the Java Platform Debugger Architecture. Links to official references about all these specifications are provided at the end.

In the Oracle Java implementation, there are two transport mechanisms provided: the socket transport, and the shared memory transport for Windows only. The socket transport (dt_socket) relies on TCP sockets bound to listen on a port for connections, and using that connection to transfer the debug session packets. Shared memory transport (dt_shmem) uses shared memory to send and receive packets. The main difference is that socket transport allows debugging a target JVM application running on a remote machine, while shared memory allows only debugging locally running applications. For the examples that follow, we’ll focus only on socket transport.

Debugging remotely using JDWP

The way a debugger connects to a target JVM is by having one act as the server listening for an incoming connection, and the other attaching to the server. The server endpoint could be either the JVM or the debugger. This applies for both socket transport and shared memory transport. Therefore, there are two steps to perform in order to remotely debug a target app:

  1. Launch either the JVM or the debugger in server mode, so that it listens at a certain address, namely an assigned IP address and port number.
  2. Attach the other part to the listening server on that address.

For example, to launch the JVM with debug options to listen on an address, we use the following option with the java executable:

java -agentlib:jdwp=transport=dt_socket,server=y,suspend=y,address=8000  ... MainClass

The -agentlib:jdwp with the comma-separated key-value suboptions instruct the JVM to load the JDWP agent and wait for a socket connection on port 8000. Here’s what each suboption does:

  • transport=dt_socket tells the JDWP agent to use socket transport.
  • server=y means that the JVM will listen for a debugger to attach to it.
  • suspend=y means the JVM will wait for the debugger to attach before executing the main class. This is also the default value. If set to n, the JVM will immediately execute the main class, while listening for the debugger connection.
  • address=8000 specifies the address at which the debug socket will listen. In this case, the JVM will listen at port 8000 for incoming connections only from the local host (starting JDK 9).

The second step is to attach the debugger at that address. All popular IDEs provide a way to easily do this. In Eclipse for example, it can be configured by going to Run -> Debug Configuration and creating a Remote Java Application configuration:

2019-07-07_17_22_26-Eclipse_remote_debug_attach

Notice that the host and port must match the address of the JDWP agent on JVM side.

[JDK 9+] Binding listen socket to all addresses

In the previous example, the address was set to 8000 (port number) without any host name or IP address. Before JDK 9, this would mean the JVM would listen on all available IP addresses making the socket accessible by debuggers on remote machines. Starting JDK 9, this was changed to only allow local connections for better security. In other words, -agentlib:jdwp=transport=dt_socket,server=y,address=8000 is now equivalent to -agentlib:jdwp=transport=dt_socket,server=y,address=localhost:8000.

To bind the socket to addresses allowing remote connections, either prefix the port with the host name, IP address, or an asterisk (*) to bind to all available IP addresses:

-agentlib:jdwp=transport=dt_socket,server=y,address=host1:8000

or

-agentlib:jdwp=transport=dt_socket,server=y,address=*:8000

More examples

Adding a timeout

We can add a timeout for the JDWP agent listening for the debugger. To make the JVM exit after 10 seconds without any debugger attaching:

-agentlib:jdwp=transport=dt_socket,server=y,address=*:8000,timeout=10000

Listening at a dynamic port

If server=y (i.e. JVM is listening for connection), we can skip the address option, which will make it use a dynamically assigned port. Since no address was specified, this allows only local connections. The chosen port will be displayed at stdout of the JVM, e.g.:

Listening for transport dt_socket at address: 12345

The other way around: attaching to a debugger

We can set server=n on the JVM command line option (or just remove the server option as it defaults to n), and tell it to attach to a debugger at a certain address. We would first run the debugger in listening mode:

2019-07-07_17_22_26-Eclipse_remote_debug_listen

Let’s say the debugger was started on host2. We would then run the JVM with the option:

-agentlib:jdwp=transport=dt_socket,address=host2:8000

Delaying JDWP connection establishment until a specific exception is thrown

A useful option to the JDWP agent is to start the JVM as normal and wait until a specific exception is thrown. For example, say you want to debug a failing application with a MyCustomException but don’t want to initiate the debugger connection until it is thrown. This can be done with the onthrow option:

-agentlib:jdwp=transport=dt_socket,server=y,address=*:8000,onthrow=com.example.MyCustomException,launch=notify_script

This would start the application normally without listening on the address. When the exception is thrown, the agent will listen on port 8000 and a debugger can be attached to it. The launch option is a mandatory option along with onthrow used to start a certain process when the exception is thrown. The process will be given the transport and port number as arguments. It can be used for example to automatically launch the debugger to attach to the listening VM upon the exception being thrown.

References

Java Platform Debugger Architecture
JDWP spec
JPDA Connection and Invocation Details
[JDK 9 Release Notes] JDWP socket connector accept only local connections by default

Configuring a DataSource in an Enterprise Application Using Payara Server

Connecting to a data source is a very common task in enterprise applications and the main interface for it is the DataSource interface from Java’s JDBC API. In this post we’ll explore how to configure a DataSource implementation using the Payara application server environment. I will be using Eclipse as IDE (the Enterprise edition), AdoptOpenJDK (build for OpenJDK 8) for running the server, and MariaDB for the database. The Payara Server also works with Oracle’s JDK and Azul Zulu. The goal is to see how to acquire connections to a database in the context of a Java EE environment via the DataSource interface, which is the preferred means to do it according to the JDBC specification.

Requirements

First we need to download and install Payara Server. You can download it from this link. Payara has several product options for download, including a microservices-oriented version and Docker images. You can just download the normal Server Full installation which takes roughly 140 MB. The latest version of the server (v5.192) supports running on JDK 11, although it seems to be in preview mode.

To facilitate developing in Eclipse, we need to install a plugin that can recognize Payara as the application server. This can be done by selecting Help -> Eclipse Marketplace, then searching for Payara in the search box. The plugin to install is called “Payara Tools”.

2019-06-03 21_33_06-Eclipse Marketplace

For the purpose of this simple demo app, the database of choice will be MariaDB, an open source database that is very close to MySQL. Even though MariaDB is not listed among the vendors when configuring the database in Payara console, as we will see later it should be possible to just pass in the DataSource implementation and it will work fine.

Links to these prerequisites are provided at the end of this post.

Setting up the project

The sample application will be a simple Web app with a simple HTTP servlet that will just connect to the database and print information about the database using JDBC. To create the project, the simplest way is from Eclipse selecting New -> Dynamic Web Project. Give a name for the project, and click on the New Runtime button, which will open a dialog to define a target server that references the installed Payara server. There you would specify the local installation of the server and which JDK it will use. These steps are shown in the two images below.

2019-06-04 14_59_04-New Dynamic Web Project
2019-06-04 14_56_09-New Server Runtime Environment

You can either click Finish to create the project, or go through the remaining pages if you want to change the context root, as shown below, which will affect the URL used to access the app from the browser (it defaults to the name of the project). Note that we will not be using any web.xml descriptor here.

2019-06-04 15_25_25-New Dynamic Web Project_context_root

Next we create a servlet under the source directory by selecting New -> Servlet, e.g. in a class com.example.SampleServlet. Eclipse will generate the basic methods to handle the HTTP GET and POST requests (namely, doGet() and doPost). A starting point would be something like the following:

@WebServlet(name = "SampleServlet", urlPatterns = "/dbinfo")
public class SampleServlet extends HttpServlet {
   ...
   @Override
   protected void doGet(HttpServletRequest request, HttpServletResponse response) throws ServletException, IOException {
      response.getWriter().append("Served at: ").append(request.getContextPath());
   }
}

We can run the app directly from Eclipse by right-clicking on the project and selecting Run As -> Run on Server. A dialog will open to select the target server, which will be populated with the one previously defined.

2019-06-04 15_28_45-Run On Server

Select Next and make sure that all properties are filled correctly with no error shown in the dialog. Note the populated domain path corresponding to domain1 (the default domain in Payara) for our Web app.

2019-06-04 15_30_33-Run On Server2

Finishing the run dialog will automatically start Payara and open a browser to the root URL of the app. Our initial servlet should respond with a simple text at the http://localhost:8080/myapp/dbinfo endpoint.

2019-06-04 15_33_34-first_run

This is a quick way to run from within Eclipse (you can also stop the server, clean its state, and otherwise manage it in the Servers view). But it can be more convenient to run Payara separately and manage it from its Admin Console.

Managing Payara from the console

To stop the running instance of Payara, run on the command line:

asadmin stop-domain

The asadamin executable exists under payara_install/bin. Payara is derived from GlassFish Server Open Source Edition, so all the administration commands from it can be used on Payara. To run the server again:

asadmin start-domain

Once started you can open the Admin Console on http://localhost:4848, where you can manage apps and resources on the server. We can already see the application that Eclipse has deployed from the Applications section.

2019-06-04 15_47_30-Payara_admin_console

Next we’ll update the application to connect to the data source. The way to access the DataSource object in this context is using the JNDI lookup facility provided by the application server. We will first register the DataSource of the database via the Admin Console, then inject it via its JNDI name.

Setting up the database

First we start the database process, which can be done using the mysqld executable. MariaDB has predefined database called test, so we can connect to it to create some tables. See Connecting to MariaDB for how to do it this. If you choose a different database vendor, the steps to connect will be different so check the documentation of that particular database.

Assuming we have populated the database test with a few tables, the next step is to register a DataSource for it in Payara. This requires the JDBC driver Jar to be added to the server in order for it to access the DataSource implementation. The JDBC driver for MariaDB can downloaded from this link. To add the Jar to Payara, run the command:

asadmin add-library path_to_jar

In the Admin Console at http://localhost:4848, go to Resources -> JDBC -> JDBC Connection Pools in the left navigation panel. A list of already existing connection pools exist, e.g. for H2 which comes by default with Payara. Click the New button to create a new Connection Pool.

The pool can be given any human friendly name, and we specify the name of the DataSource implementation org.mariadb.jdbc.MySQLDataSource. Upon providing the implementation, Payara seemingly uses it to derive a list of properties to configure the DataSource, e.g. the host, port and database, which need to be filled.

2019-06-04 17_29_09-New JDBC Connection Pool (Step 1 of 2)

2019-06-04 17_29_09-New JDBC Connection Pool (Step 2 of 2)

After filling all needed properties and saving the JDBC Connection Pool, make sure that clicking the Ping button successfully connects to it.

2019-06-04 17_50_18-Ping

Now that the JDBC Connection Pool is created, we can register a JNDI binding for the DataSource, by going to Resources -> JDBC -> JDBC Resources, and selecting New. The JDBC Resource must reference the Pool just created and have a unique name.

2019-06-04 18_06_11-New JDBC Resource

Accessing the DataSource

With the DataSource registered, the servlet class can declare it as a dependency using @Resource:

@Resource(name="java/myapp/jdbc_ds")
DataSource dataSource;

@Override
protected void doGet(HttpServletRequest request, HttpServletResponse response) throws ServletException, IOException {
    try(Connection connection = dataSource.getConnection()) {
        DatabaseMetaData databaseMetaData = connection.getMetaData();
        PrintWriter writer = response.getWriter();
        writer.append("DB info: ")
              .append(databaseMetaData.getDatabaseProductName())
              .append("\nCatalog name: ")
              .append(connection.getCatalog());
        try(ResultSet tables = databaseMetaData.getTables(connection.getCatalog(), null, null, new String[] { "TABLE" })) {
            while(tables.next()) {
                writer.append("\n" + tables.getString("TABLE_NAME"));
            }
        }
    } catch(SQLException ex) {
        response.getWriter().append("Error " + ex.getMessage());
        getServletContext().log("Error connecting to DB", ex);
    }
}

Note that the underlying implementation will use a pool of connections, from which every request will borrow a connection from the pool and return it once done. The pool configuration can be adjusted from the JDBC Connection Pool just created.

We can now run the example just like we did using Eclipse. Another way of doing it is by packaging the app in a WAR file by right-clicking on the project and selecting Export -> WAR file. Then deploy it by running:

asadmin deploy --force path_to_war_file

Note the use of --force to force redeploying the app if it already existed. The result of http://localhost:8080/myapp/dbinfo should look like the below.

2019-06-04 18_31_47-output

Download links

OpenJDK 8 – https://adoptopenjdk.net/index.html
Payara Server – https://www.payara.fish/software/downloads
Eclipse – https://www.eclipse.org/downloads/
Payara Tools for Eclipse – https://marketplace.eclipse.org/content/payara-tools
MariaDB – https://mariadb.org/download/
MariaDB JDBC driver – https://downloads.mariadb.com/Connectors/java/

References

https://docs.payara.fish/documentation/payara-server/
https://eclipse-ee4j.github.io/glassfish/docs/latest/quick-start-guide/toc.html
https://blog.payara.fish/an-intro-to-connection-pools-in-payara-server-5

Guide to Behavior-Driven Development in Java

When working on a software project in a team that includes people with different roles, such as in agile environments, there is always a risk of misalignment in the understanding of end user requirements and what the software should do. The developer may not fully understand them because they may not be clearly formulated by the product owner. The product owner may not realize the complexity of the task being assigned for development and the impact it may have on its delivery. The tester may reason about different edge cases or scenarios that would have been easier to account for at an early stage of the development.

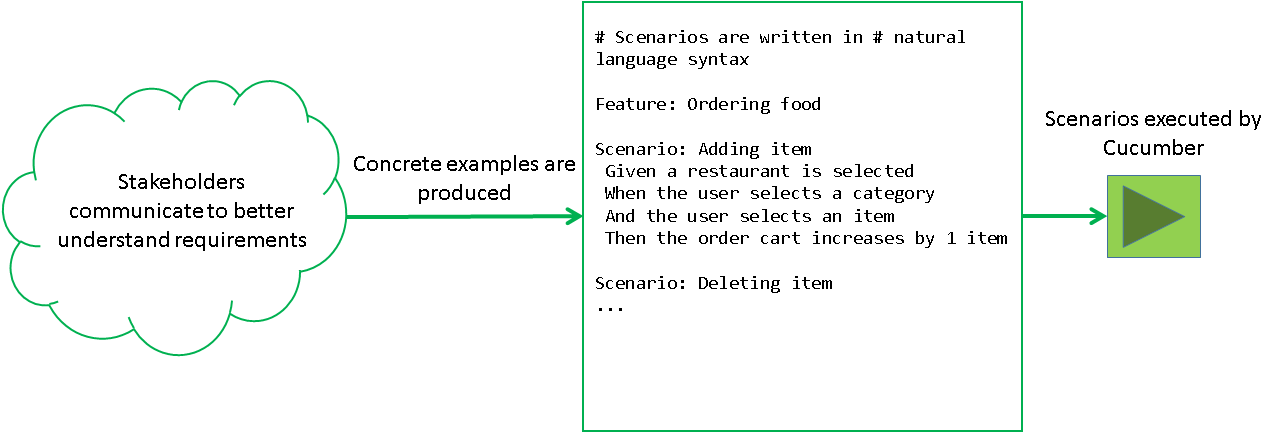
To help improve the development approach through better collaboration between business and developers, behavior-driven development (BDD) was established as a relatively recent software development approach, building on the main ideas of test-driven development (TDD), and using a higher level granularity in the test approach: instead of unit tests for classes and methods, the tests are acceptance tests that validate the behavior of the application. These acceptance tests are derived from concrete examples that are formulated by the team members, so that the behavior of the system is better understood. When these example scenarios are formulated during conversations between the different members, the requirements are likely to be expressed more clearly, the input of the developer will likely be incorporated into them, and the tester will contribute with more scenarios to cover in the tests.

Once these example scenarios are produced, they can be expressed in a format that is easy to read by non-developers, yet follows a certain template that makes it executable by a BDD tool such as Cucumber or JBehave. This format, called the Gherkin syntax, can serve multiple purposes at once:

  1. The scenarios act as executable specifications for the behavior of the feature under test.
  2. These specifications can be executed as automated regression tests.
  3. The scenarios act as documentation about the feature that follows the main code in a version control system.

BDD_with_Cucumber

In Cucumber, which supports several programming languages, such scenarios are written in .feature files that can be added in the project along with the test code. Each file contains scenarios for a specific feature, and each scenario consists of steps, where a step starts for example with Given, When or Then. These steps specify what the scenario is, what assumption(s) it uses, and how the feature will behave in terms of the outcome. In order to execute these steps, we also need the test code (also known as glue code) that will perform whatever action the steps should do. Each step in the feature files will be mapped to a Java method that contains its step definition.

Sample project

As a demonstration, let’s assume we have a simple food ordering application where we want to implement features for adding and removing a meal item from the user’s order. For convenience, let’s create a new project using Cucumber’s Maven archetype support, which should set up the project directory with the minimum code so that we can simply add feature files and step definition classes.

mvn archetype:generate -DarchetypeGroupId=io.cucumber                    \
   -DarchetypeArtifactId=cucumber-archetype -DarchetypeVersion=2.3.1.2   \
   -DgroupId=com.example -DartifactId=cucumber-example                   \
   -Dpackage=com.example.cucumber -Dversion=1.0.0-SNAPSHOT               \
   -DinteractiveMode=false

This should generate a project with a POM file that includes dependencies on the Cucumber artifacts in addition to JUnit, which is itself relied upon to run the tests:

<dependency>
    <groupId>io.cucumber</groupId>
    <artifactId>cucumber-java</artifactId>
    <version>4.2.0</version>
    <scope>test</scope>
</dependency>

<dependency>
    <groupId>io.cucumber</groupId>
    <artifactId>cucumber-junit</artifactId>
    <version>4.2.0</version>
    <scope>test</scope>
</dependency>

<dependency>
    <groupId>junit</groupId>
    <artifactId>junit</artifactId>
    <version>4.12</version>
    <scope>test</scope>
</dependency>

Note: It seems the archetype generates dependency snippets referencing an old version of Cucumber, so in the above dependencies I updated them to the latest retrieved from Maven Central.

The entry point is in the file RunCucumberTest.java, which defines an empty class annotated with @RunWith(Cucumber.class) so that JUnit invokes the custom Cucumber runner, which will automatically scan for feature files and corresponding step definitions and execute them:

@RunWith(Cucumber.class)
@CucumberOptions(plugin = {"pretty"})
public class RunCucumberTest {
}

The CucumberOptions annotation specifies the built-in “pretty” formatter plugin for the report containing test results. This annotation can also be used to specify other options.

With the project set up and after importing it into an IDE, we can start adding our features to the food ordering service, which is assumed to already exist in a class FoodOrderingService (let’s imagine the application already existed before adding features to it). The features to be implemented are adding and removing an item from the current order, as shown in the below code (for conciseness, Lombok annotations are used):

@EqualsAndHashCode(of = "name")   // items are identified by name
@AllArgsConstructor
public class Item {
    @NonNull String name;
    @NonNull String category;
}

@Getter
public class Order {
    List<Item> items = new ArrayList<>();
    BigDecimal price = BigDecimal.ZERO;
}

public class FoodOrderService {

    private Order order = new Order();

    public Optional<Order> getOrder() {
        return Optional.ofNullable(order);
    }

    public void addItem(Item item) {
        // TODO
    }

    public void removeItem(Item item) {
        // TODO
    }

}

Before implementing these features, we add corresponding .feature files that contain some scenarios to describe their behaviors. We can treat these as two features: adding an item to an order, and removing an item from an order. Here is a simple feature file for adding an item. For the sake of brevity, the feature file for removing an item is omitted (it can be viewed in the source code linked to at the end of this post).

Feature: Adding an item to order
  I want to be able to add an item to a current order.

  Scenario: Adding an item to an empty order
    Given I have not yet ordered anything
    When I go to the "Burgers" category
    And I select a "Cheeseburger"
    Then I have a new order
    And the order has 1 item in it

  Scenario Outline: Price of a single item order
    Given I have not yet ordered anything
    When I go to the "<category>" category
    And I select <item>
    Then my current order total is <price>

    Examples: 
      | category   | item                 | price |
      | Sandwiches | a "Chicken Sandwich" | $9    |
      | Dessert    | an "Oreo Cheesecake" | $7    |

The file starts with the Feature keyword and a short description of the feature, followed by a more elaborate description that can serve as documentation, and two scenarios for adding an item. The second scenario (called a scenario outline) illustrates how to repeat a certain scenario for different values.

Next we need to add the step definitions for these steps (the lines starting with Given, When, And, Then, etc). We already have a file src/test/java/com/example/cucumber/Stepdefs.java which was generated with the Maven archetype, so we can add our step definitions there:

public class Stepdefs {

    FoodOrderService foodOrderService;
    String category;

    @Given("I have not yet ordered anything")
    public void no_order_yet() {
        foodOrderService = new FoodOrderService();
    }

    @When("I go to the {string} category")
    public void i_go_to_category(String category) {
        this.category = category;
    }

    @When("I select a/an {string}")
    public void i_select_item(String itemName) {
        foodOrderService.addItem(new Item(itemName, category));
    }

    @Then("I have a new order")
    public void i_have_new_order() {
        assertTrue("Order was null", foodOrderService.getOrder().isPresent());
    }

    @Then("the order has {int} item(s) in it")
    public void order_has_n_item_in_it(int itemCount) {
        assertEquals("Wrong number of items in order",
                itemCount, foodOrderService.getOrder().get().getItems().size());
    }

    @Then("my current order total is \\$([\\d\\.]+)")
    public void current_order_total_is(String price) {
        assertEquals("Wrong order price",
                new BigDecimal(price), foodOrderService.getOrder().get().getPrice());
    }

}

Note that the @Then annotated methods are typically where we do assertions against expected values.

Mapping steps to their step definitions

The way Cucumber maps each step to its definition is simple: Before a scenario is run, every step definition class will be instantiated and annotated methods (with @Given, @Then, etc) will be mapped to the steps by the expression in the annotation. The expression can be either a regular expression, or a Cucumber expression. In the above step definitions, some methods use Cucumber expressions, e.g. capturing integer parameters using {int}. To use these expressions, an additional dependency needs to be added to the POM:

<dependency>
    <groupId>io.cucumber</groupId>
    <artifactId>cucumber-expressions</artifactId>
    <version>6.2.0</version>
    <scope>test</scope>
</dependency>

Running the tests using mvn test results in the following expected errors:

Tests run: 3, Failures: 1, Errors: 2, Skipped: 0, Time elapsed: 0.561 sec <<< FAILURE!
Adding an item to an empty order(Adding an item to order)  Time elapsed: 0.032 sec  <<< FAILURE!
java.lang.AssertionError: Order was null
        at org.junit.Assert.fail(Assert.java:88)
        at org.junit.Assert.assertTrue(Assert.java:41)
        at com.example.cucumber.Stepdefs.i_have_new_order(Stepdefs.java:30)
        at ?.I have a new order(com/example/cucumber/adding_an_item.feature:26)

Price of a single item order(Adding an item to order)  Time elapsed: 0 sec  <<< ERROR!
java.util.NoSuchElementException: No value present
        at java.util.Optional.get(Optional.java:135)
        at com.example.cucumber.Stepdefs.current_order_total_is(Stepdefs.java:42)
        at ?.my current order total is $9(com/example/cucumber/adding_an_item.feature:33)

Price of a single item order(Adding an item to order)  Time elapsed: 0 sec  <<< ERROR!
java.util.NoSuchElementException: No value present
        at java.util.Optional.get(Optional.java:135)
        at com.example.cucumber.Stepdefs.current_order_total_is(Stepdefs.java:42)
        at ?.my current order total is $7(com/example/cucumber/adding_an_item.feature:33)

The next step is to implement the features to make the above tests pass. As a starting point, the price information are encapsulated in a BasicItemRepository class, which contains just enough logic code to make the tests successful. Later we can improve it by querying the information from a database, and re-running the tests to make sure that no regression occurred during the improvement. For now, we keep it simple by checking the item name and returning its appropriate price.

public class FoodOrderService {

    private final ItemRepository itemRepository;
    private Order order;

    public FoodOrderService() {
        itemRepository = new BasicItemRepository();
    }

    public Optional<Order> getOrder() {
        return Optional.ofNullable(order);
    }

    public void addItem(Item item) {
        if(order == null) {
            order = new Order();
        }
        order.items.add(item);

        BigDecimal itemPrice = itemRepository.getItemPrice(item);
        order.price = order.price.add(itemPrice);
    }

    public void removeItem(Item item) {
        getOrder().ifPresent(order -> {
            order.items.remove(item);
            order.price = order.price.subtract(itemRepository.getItemPrice(item));
        });
    }
}

interface ItemRepository {
    BigDecimal getItemPrice(Item item);
}

public class BasicItemRepository implements ItemRepository {

    @Override
    public BigDecimal getItemPrice(Item item) {
        if(item.name.equalsIgnoreCase("Chicken Sandwich")) {
            return new BigDecimal(9);
        } else if(item.name.equalsIgnoreCase("Oreo Cheesecake")) {
            return new BigDecimal(7);
        } else if(item.name.equalsIgnoreCase("Cheeseburger")) {
            return new BigDecimal(9);
        }
        throw new IllegalArgumentException("Unknown item " + item.name);
    }
}

Running the scenarios again with mvn clean test result in a build success.

Some improvements to the organization of scenarios and step definitions

Background steps

In the previous feature file, the same Given step was used. If at least one Given is shared by all scenarios in the feature, it can be moved to a Background:

Feature: Adding an item to order
  I want to be able to add an item to a current order.

  Background:
    Given I have not yet ordered anything

  Scenario: Adding an item to an empty order
    When I go to the "Burgers" category
    And I select a "Cheeseburger"
    Then I have a new order
    And the order has 1 item in it

  Scenario Outline: Price of a single item order
    When I go to the "<category>" category
    And I select <item>
    Then my current order total is <price>

    ...
Organizing step definitions and their dependencies

The mapping between steps and the methods containing their definitions does not depend on the class in which the method is defined. As long as Cucumber finds one method with a matching expression, it will run that method. This leaves the decision of where to place step definitions up to the developer. As is the case with the classes of the main code, step definition classes should be organized in a logical way to make their maintenance easier, especially when the number of tests increases.

One of the biggest challenges when writing step definitions is in maintaining the state between dependent steps in a given scenario. As shown in the Stepdefs class, a field category was used to save the parameter passed to the “When I go to the {string} category“. The field was subsequently used in the next step. This is a simple way to maintain state if every feature file has a separate class that encapsulates all of its step definitions.

Sometimes, however, we may want to split step definitions into more than one class for better maintainability. The best way to share state between inter-class step definitions is to use a shared object, and use dependency injection to pass that object to every instance that needs it. The Cucumber project has bindings to several dependency injection frameworks, including Spring and Guice. If the project is already using a DI framework, it’s probably better to use it in the tests. Otherwise, the simplest one to use is PicoContainer.

To carry out this state management between several classes, let’s assume that we want to split the Stepdefs class into two classes: ItemStepdefs and OrderStepdefs. The first class fills the object with state, and the second uses that state in the steps that need it. This may not normally make sense for this feature. For this example, let’s use the Spring solution; the PicoContainer one is straightforward and does not require any configuration or annotations. First we add the required dependencies. We need both the Cucumber binding and Spring dependencies because our sample project did not initially use Spring:

<dependency>
    <groupId>io.cucumber</groupId>
    <artifactId>cucumber-spring</artifactId>
    <version>4.2.0</version>
    <scope>test</scope>
</dependency>
<dependency>
    <groupId>org.springframework</groupId>
    <artifactId>spring-beans</artifactId>
    <version>5.1.3.RELEASE</version>
    <scope>test</scope>
</dependency>
<dependency>
    <groupId>org.springframework</groupId>
    <artifactId>spring-context</artifactId>
    <version>5.1.3.RELEASE</version>
    <scope>test</scope>
</dependency>
<dependency>
    <groupId>org.springframework</groupId>
    <artifactId>spring-test</artifactId>
    <version>5.1.3.RELEASE</version>
    <scope>test</scope>
</dependency>

Note also the dependency on spring-test.

First we create a class that contains the state to be shared between the step definitions, and annotate it with @Component:

@Component
public class ItemOrderInfo {

    String category;
    FoodOrderService foodOrderService;

}

We also need a configuration class for Spring. We assume that the above <codeComponent class is in the same package of this configuration class:

@Configuration
@ComponentScan
public class SpringTestConfig {
}

Next we annotate one of the two step definition classes with @ContextConfiguration from the spring-test, pointing to the test configuration class that was just created. At this point we can use Spring’s dependency injection mechanism to provide a singleton instance of ItemOrderInfo, the class containing state:

@ContextConfiguration(classes = SpringTestConfig.class)
public class ItemStepdefs {

    @Autowired
    ItemOrderInfo itemInfo;

    @Given("I have not yet ordered anything")
    public void no_order_yet() {
        itemInfo.foodOrderService = new FoodOrderService();
    }

    @When("I go to the {string} category")
    public void i_go_to_category(String category) {
        this.itemInfo.category = category;
    }
}

We can use the same object in the other step definition class:

public class OrderStepdefs {

    @Autowired
    ItemOrderInfo itemInfo;

    @When("I select a/an {string}")
    public void i_select_item(String itemName) {
        itemInfo.foodOrderService.addItem(new Item(itemName, itemInfo.category));
    }

    @Then("I have a new order")
    public void i_have_new_order() {
        assertTrue("Order was null", itemInfo.foodOrderService.getOrder().isPresent());
    }

    ...
}
Hooks

There are some annotations that can be used to hook into the lifecycle of the scenario. For example, to prepare something before every scenario, we can add it in a @Before annotated method (this is different than the org.junit.Before annotation provided by JUnit):

@Before
public void prepare(){
    // Set up something before each scenario
}

Normally this is where things like initializing a resource or preparing a test database can be done.

On the other hand, the @After annotation allows executing code after each scenario. There are also @BeforeStep and @AfterStep annotations.

Filtering scenarios using tags

In some cases we want to run only a subset of scenarios. A handy feature called tags allows labeling specific features or scenarios such that we can reference them when running the tests. The feature file we have so far can be enriched with tags as follows:

@addItem
Feature: Adding an item to order
  I want to be able to add an item to a current order.

  @empty
  Scenario: Adding an item to an empty order
    Given I have not yet ordered anything
    When I go to the "Burgers" category
    And I select a "Cheeseburger"
    Then I have a new order
    And the order has 1 item in it

  @price
  Scenario Outline: Price of a single item order
    Given I have not yet ordered anything
    When I go to the "<category>" category
    And I select <item>
    ...

To run only scenarios tagged with @price, we can pass the tag in the cucumber.options system property:

mvn clean test -Dcucumber.options='--tags "@price"'

The hook annotations (@Before and @After) shown earlier can also take tag expressions to restrict their execution.

Conclusion

The above sample project illustrates a simple workflow that follows behavior-driven development practices: deriving scenarios about our features, formulating them in a natural language syntax, and using them to drive the implementation. The source code can be found here.

Further resources

https://dannorth.net/introducing-bdd/
https://docs.cucumber.io/cucumber/
https://github.com/cucumber/cucumber-jvm/